This guide covers creating and managing batch wallet notifications using the PassEntry Dashboard. If you want to send batch notifications programmatically or integrate them into automated workflows, see the
Batch Wallet Messaging API documentation.
Creating a Wallet Notifications Batch
Video transcript
Video transcript
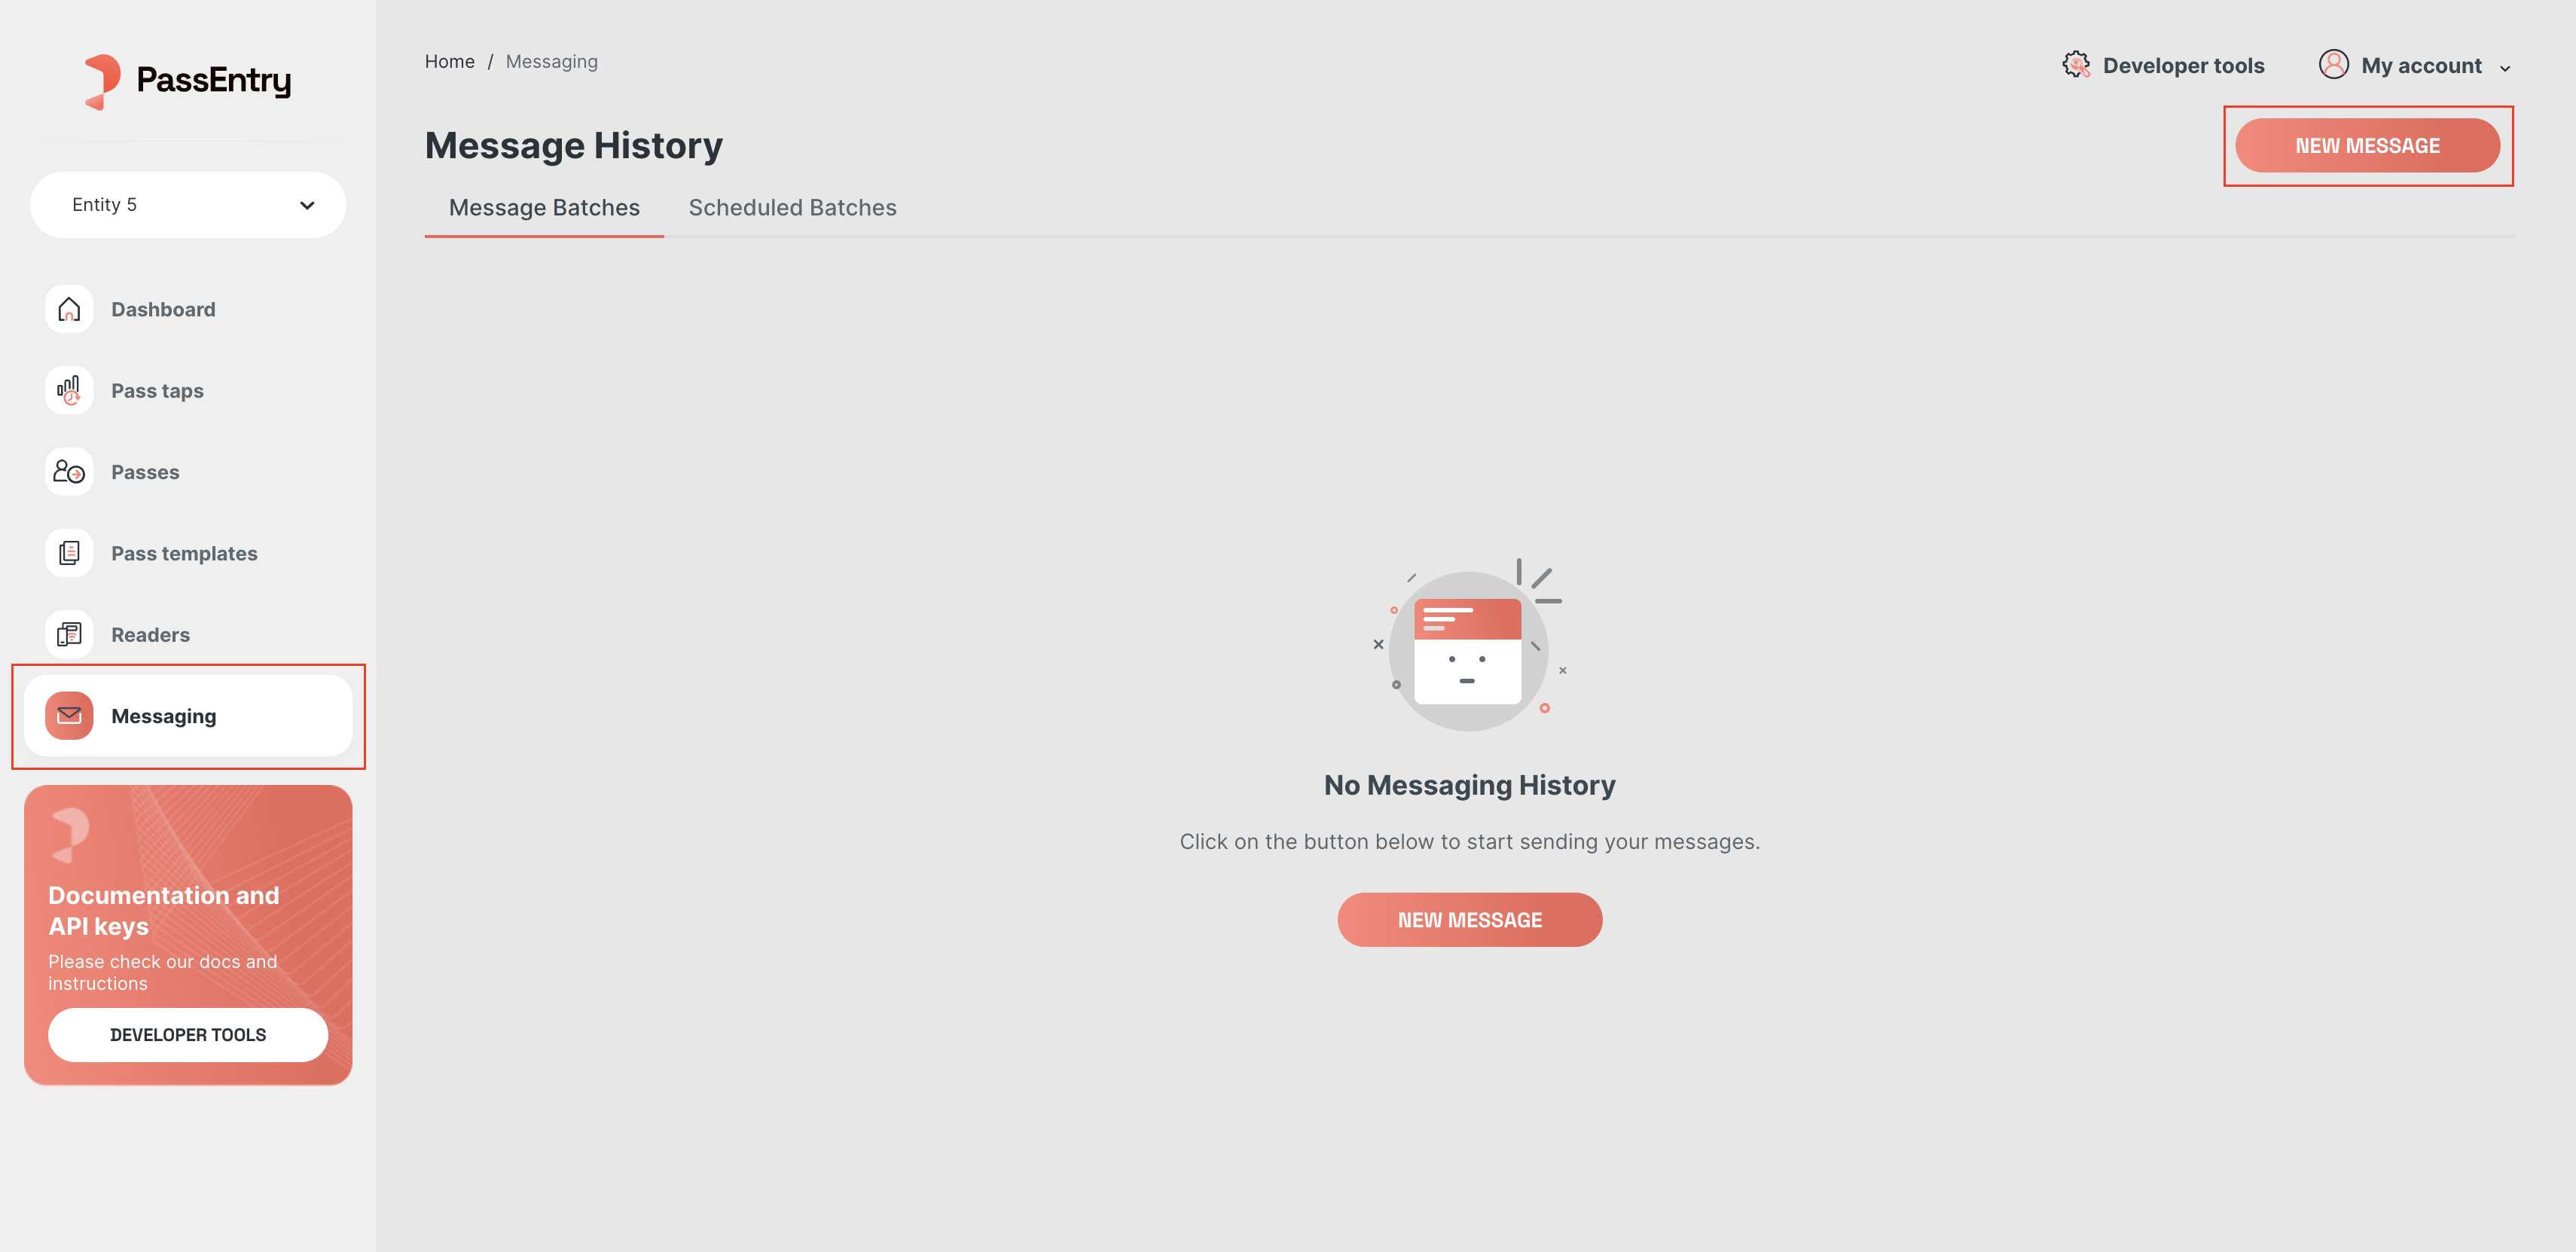
In this video, we’ll walk you through how to send a batch message from the PassEntry dashboard. To get started navigate to the messaging section using left-hand navigation bar.
Click the “New Message” then review and accept the terms and conditions.
Next, give your message batch a title, this helps you stay organised. You can also add tags to group batches together for specific campaigns or purposes,
which we’ll cover in more detail in another video.
Now its time to write your message. For this example: “Enjoy 10% off at the bar from 7pm tonight.”
once your message is ready you can schedule it for a specific time. in this case we’re sending it at 4 pm giving attendees plenty of time to grab a drink before the event kicks off.
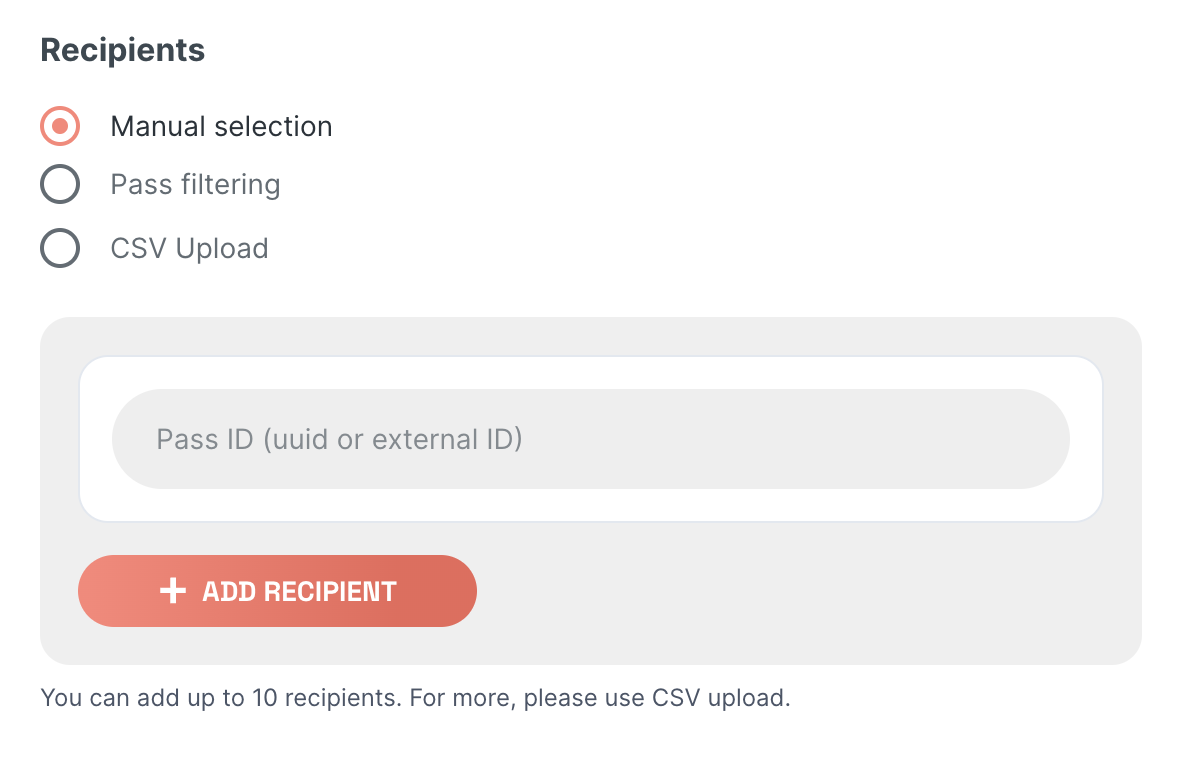
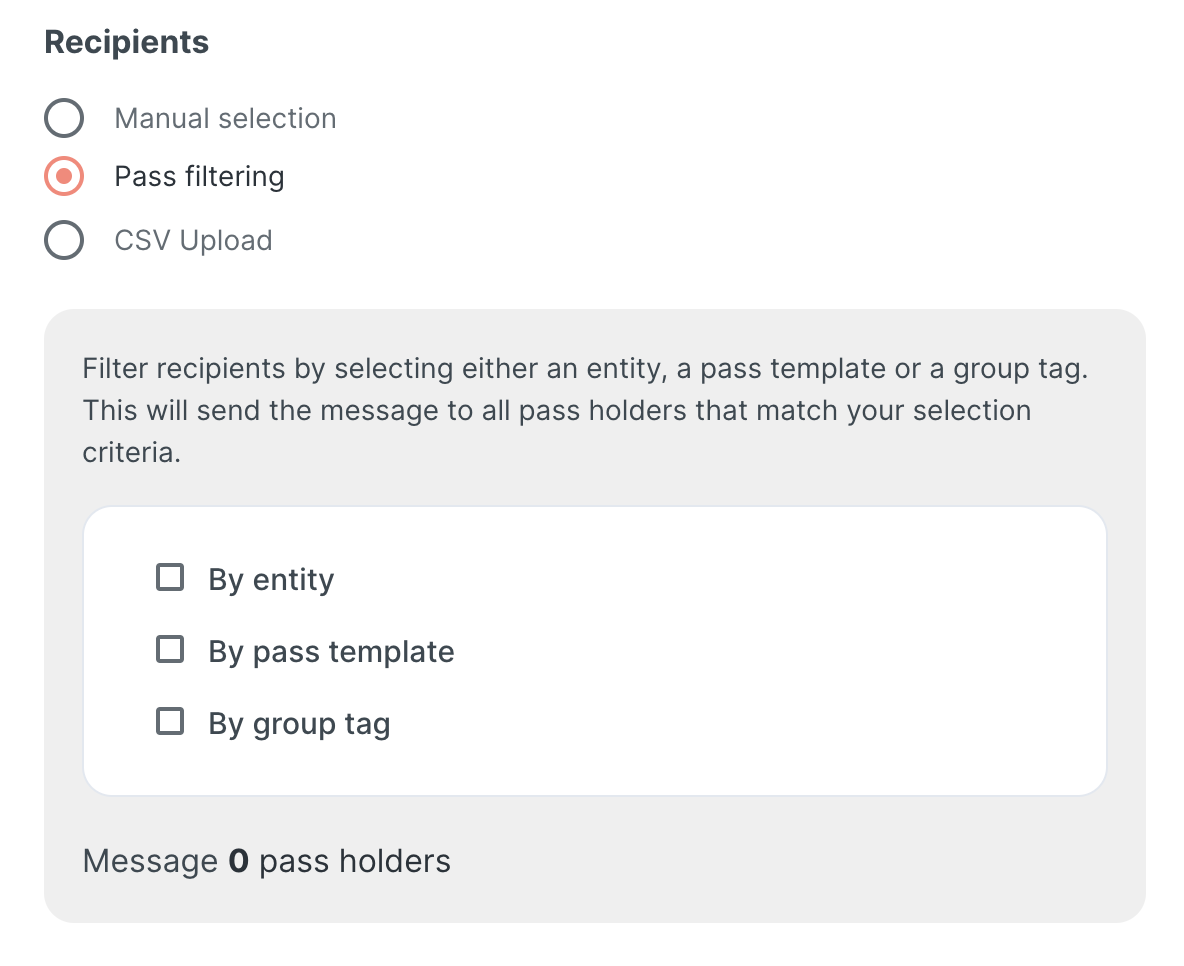
The final step is selecting your audience. PassEntry gives you several targeting options,
which we’ll cover in depth in another video. You can send to individual passes by UUID or external ID, filter by entity, pass template or group tags,
or upload a CSV if you’ve already segmented your audience externally. For this example we’re using Pass Template to message all attendees of a fictional event.
Click Send Message, confirmation the number of passes in the pop-up and hit send.
PassEntry will validate each pass and schedule delivery. From the message menu you can review the details, or if needed, override the scheduled time and send immediately.
That’s a quick introduction to batch messaging. Check out the other videos in this series to explore more of the messaging features.
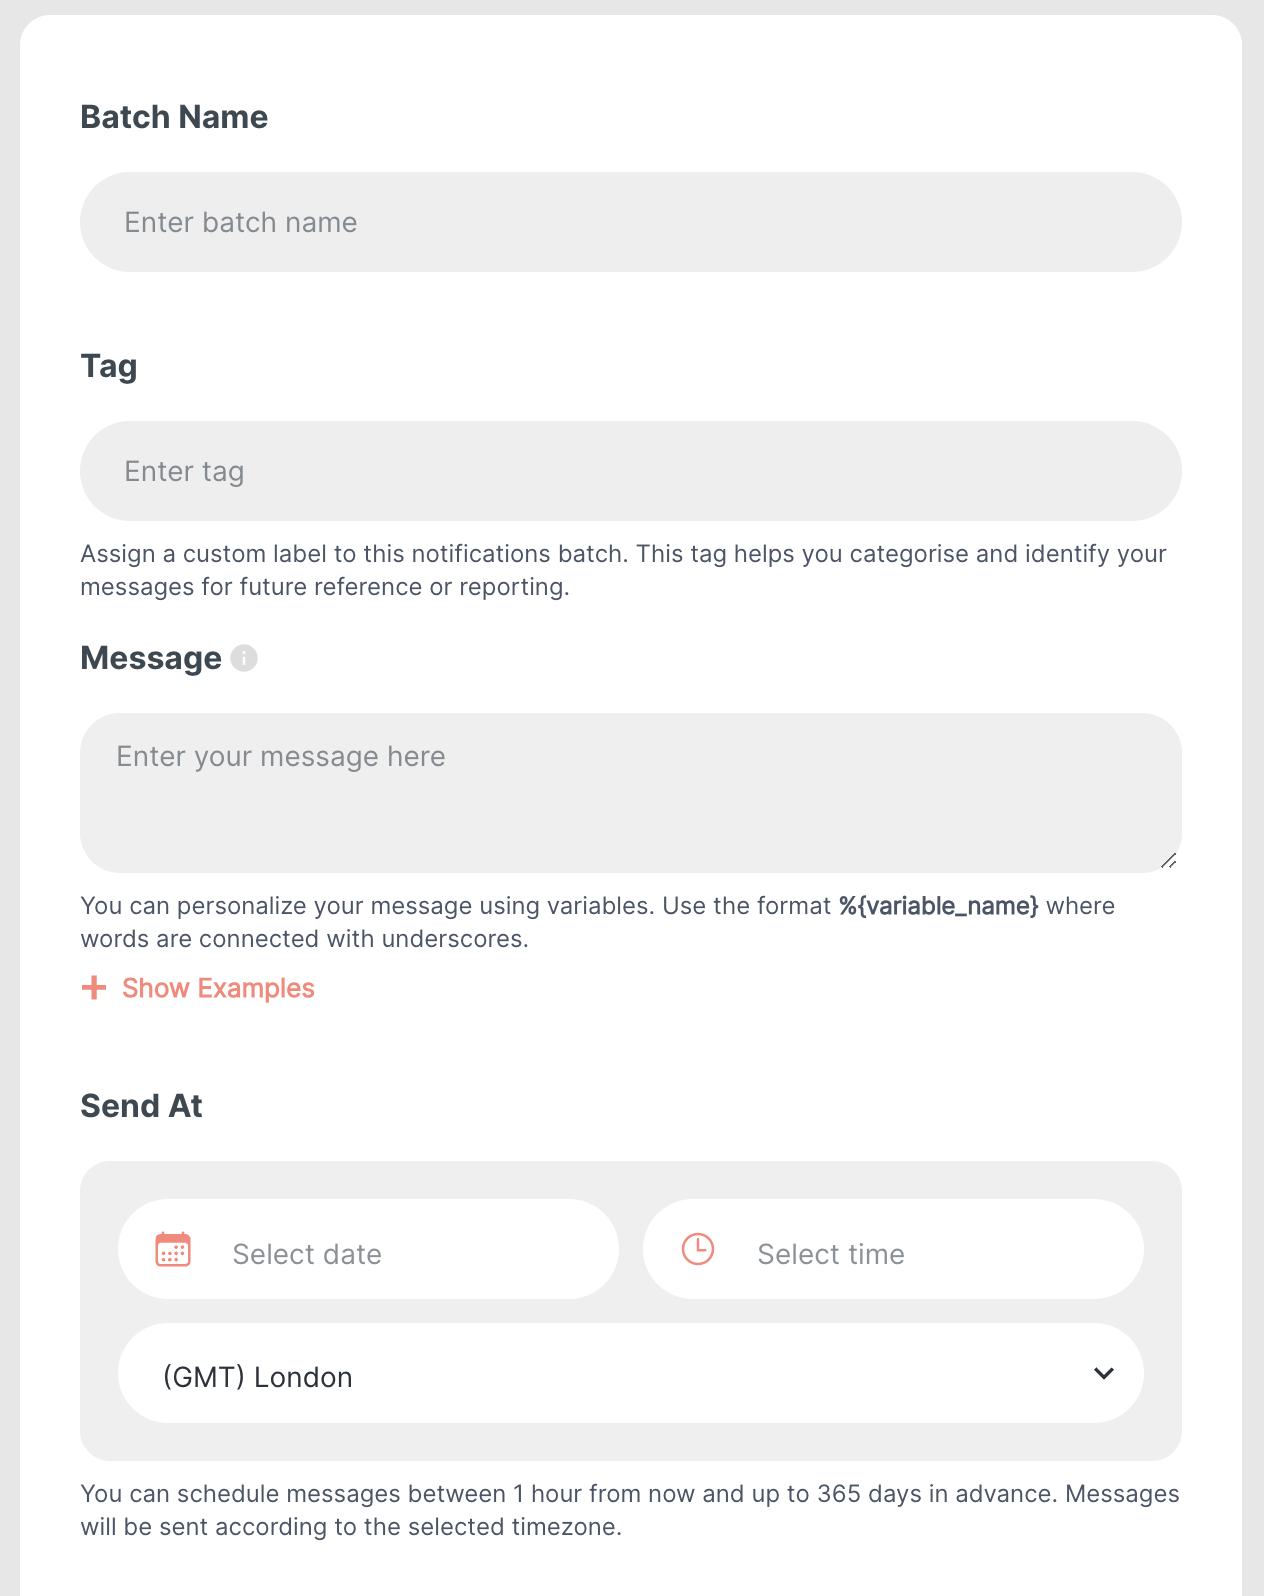
- Batch Name. Optional. Enter a unique name for the notification batch. This helps you identify and manage batches easily in the future. If you choose not to include a name, the batch will automatically be named “Batch [DateTime]”.
- Tag. Optional. Add a custom label to group and track your notification batches.
-
Message. Required. Write the message you want to send to your recipients. You can use variables to customize the message. Variables are placeholders like
%{variable_name}that will be replaced with specific values for each recipient. Click Show Examples for help. - Send At. Required. Choose a date, time, and timezone to schedule the notifications. You can schedule messages to be sent anytime between 1 hour and 365 days in advance, making it convenient to plan campaigns.
Recipients
There are three ways to define recipients for your message:Video transcript
Video transcript
In this video, we’ll walk you through the powerful pass filtering options available when sending batch messages through the dashboard.
To get started, we’ve created a message batch and assigned it a name and tag.
We’ve added our message content and scheduled it to send at 4pm on the day of the event.
Now let’s explore how to control exactly who receives your message. The first option is filtering by individual pass.
If you need to target a specific user — or a small selection of users — you can enter a UUID or External Pass ID directly into the recipient field.
You can add up to ten IDs at a time, giving you precise, targeted control. This is ideal for one-to-one or high-value communications.
When you need to communicate at scale, we offer several broader filtering options. The first is by entity. Selecting this will send your message to every pass holder within that entity.
If no dropdown is present, the message will go to your entire pass holder base. The second option is by pass template. This allows you to target all pass holders belonging to a specific template. For example,
if you have templates set up for individual events or artists — such as James Blake or Yasmin Lacey — you can direct your message exclusively to the pass holders for that template.
Our most flexible option is filtering by group tag. Group tags allow you to segment your pass holders, giving you granular control over your audience.
For instance, combining a persona tag of Regular with a source tag of Instagram will send messages to all passes tagged with those attributes in this case seven.
Switching to a VIP tag returns eight. The more consistently you tag your passes, the more powerful and precise your segmentation becomes, making this an exceptionally effective tool for targeted messaging campaigns.
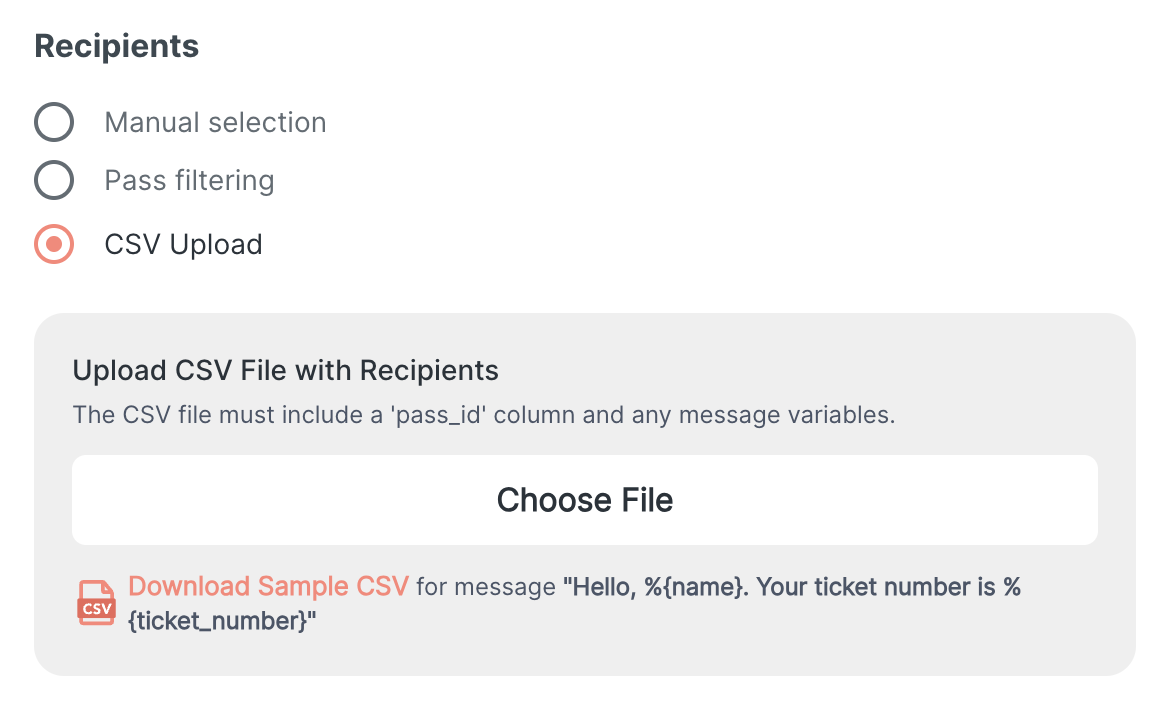
Finally, for maximum flexibility, you also have the option to upload a CSV file — a feature we’ll cover in detail in a separate video.
This allows you to provide a custom list of pass IDs and individualise messages for each recipient using variables Whether you’re sending a single targeted message or broadcasting to thousands,
the dashboard gives you the tools to reach exactly the right audience, every time. For more on messaging check out the other videos in this series.
- Pass IDs. Manually enter the pass UUID or external ID for each recipient, along with any variables needed for the message. You can add up to 10 recipients via the frontend, with 500 recipients limit when using the API.
- Pass Filtering. Send messages to everyone within a specific segment, which can be entity-scoped, pass template-scoped, or group tag-scoped. The recipient counter will display how many users you’re targeting. Note that variables cannot be used in messages when using pass filtering.
- CSV Upload. Upload a CSV file containing recipient data (up to 10 MB). The required column is
pass_id, which accepts either the pass UUID or external ID. If your message uses variables, add a column for each variable, with the column name matching the variable name in the message.
Example: For a message like “Hello, %{name%}. Your ticket number is %{ticket_number%}”, your CSV file should include columns namednameandticket_number: DOWNLOAD
Message History: tracking and managing your batches
Once you submit your first message batch, you can track all your batches on the Message History page, which is divided into two tabs: Message Batches and Scheduled Message Batches.- Main Information: Each batch displays key details such as the batch name, message text and type, status, and completion time.
- Error Handling: If any errors occurred, you can download an error CSV directly from this page.
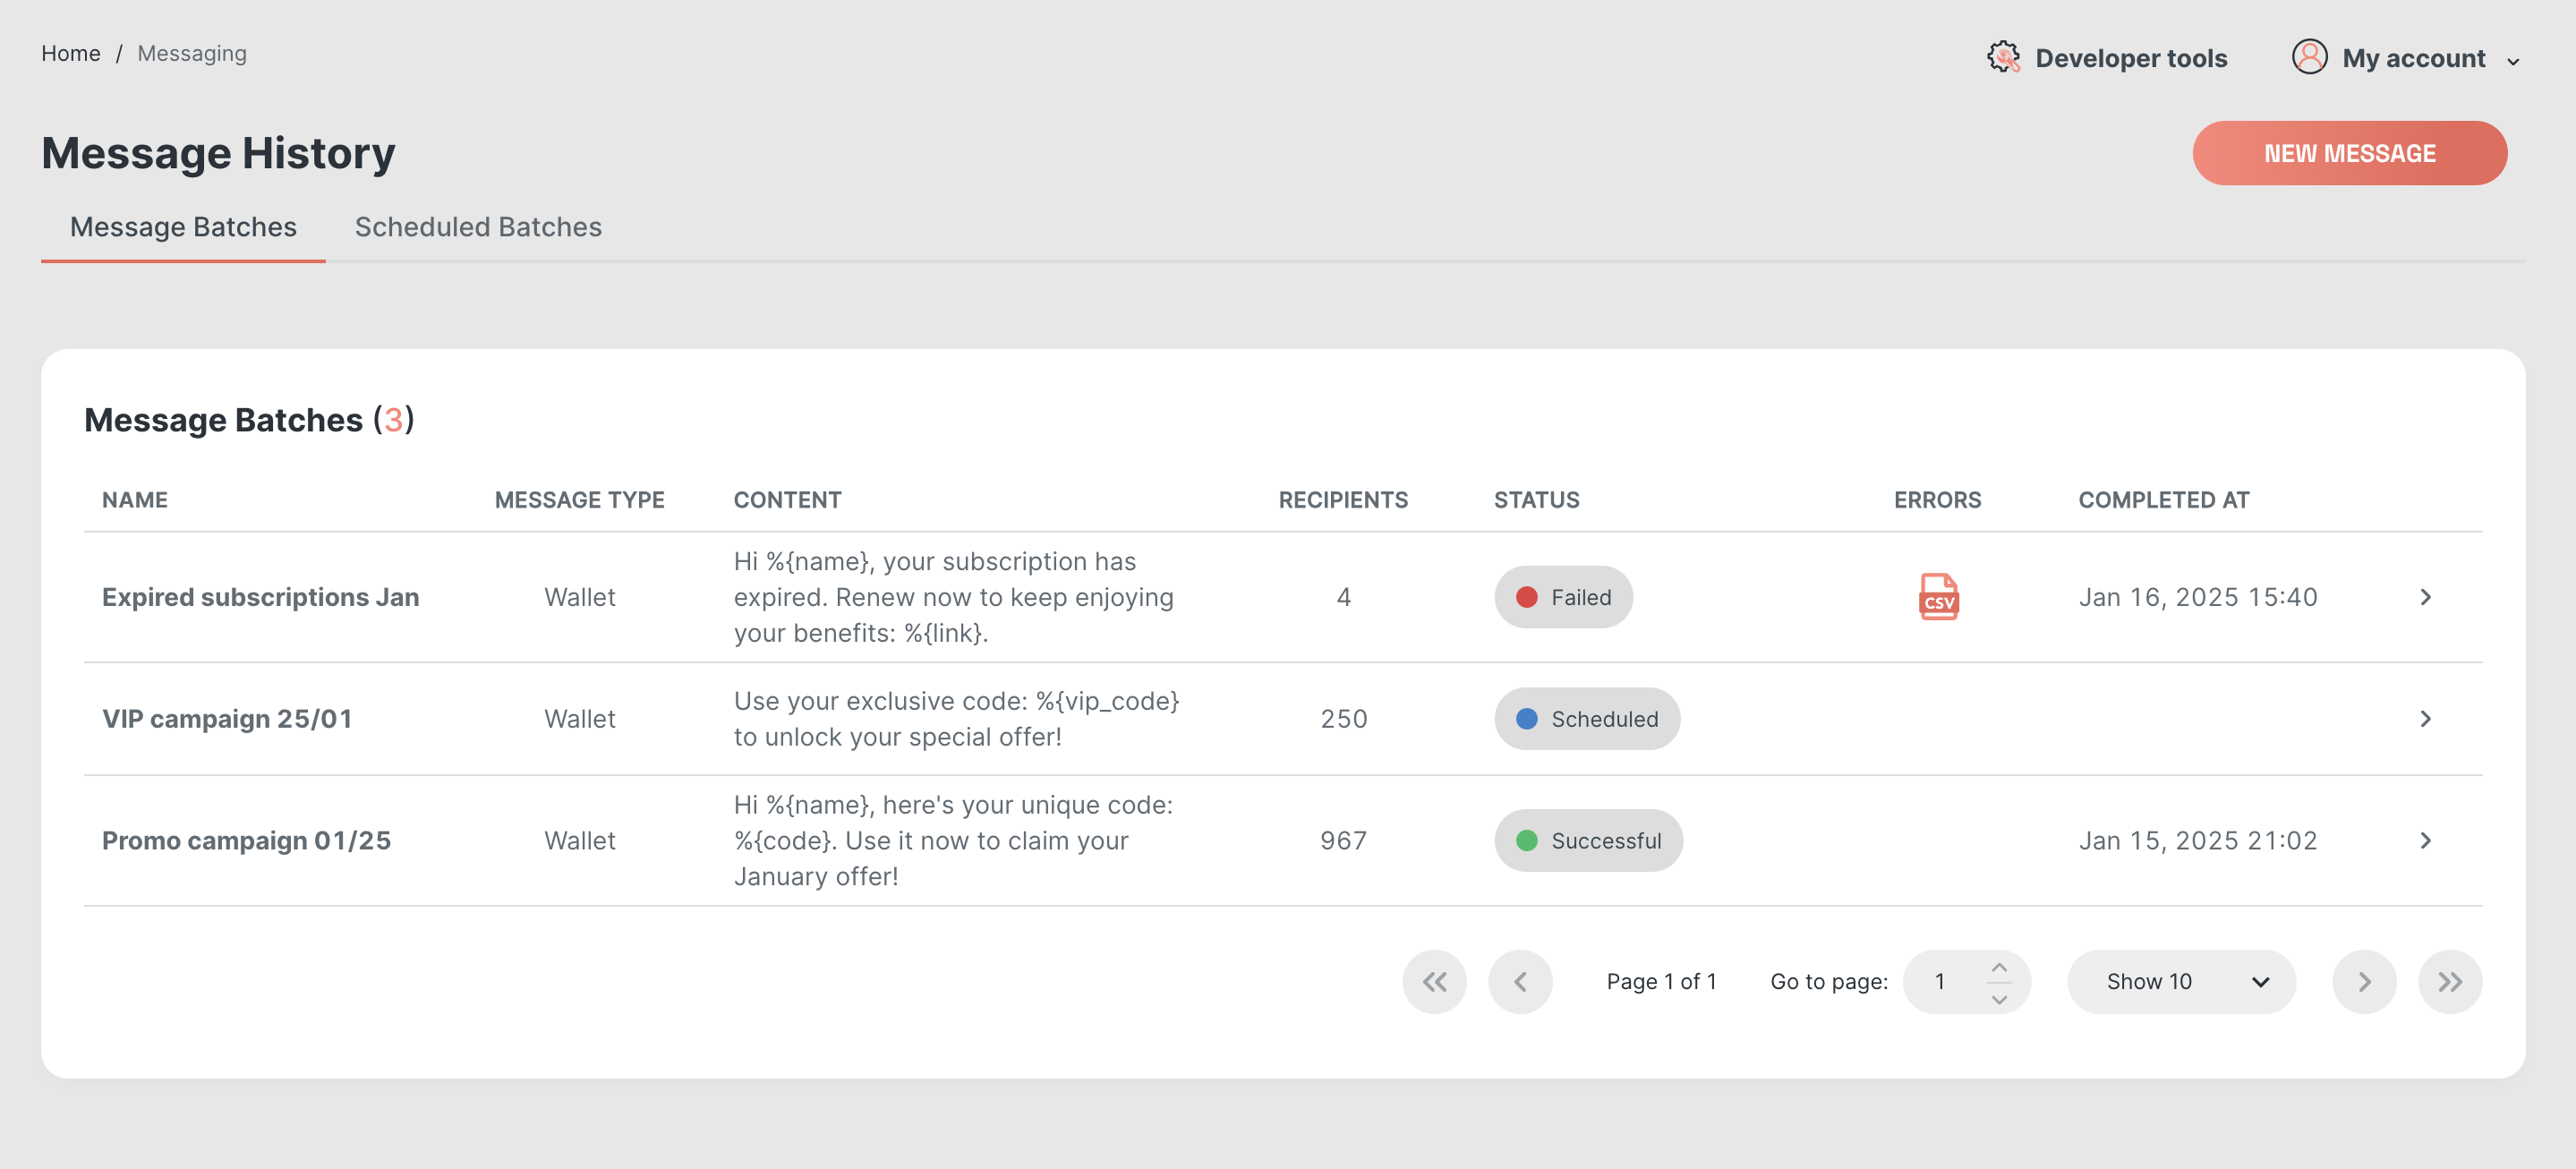
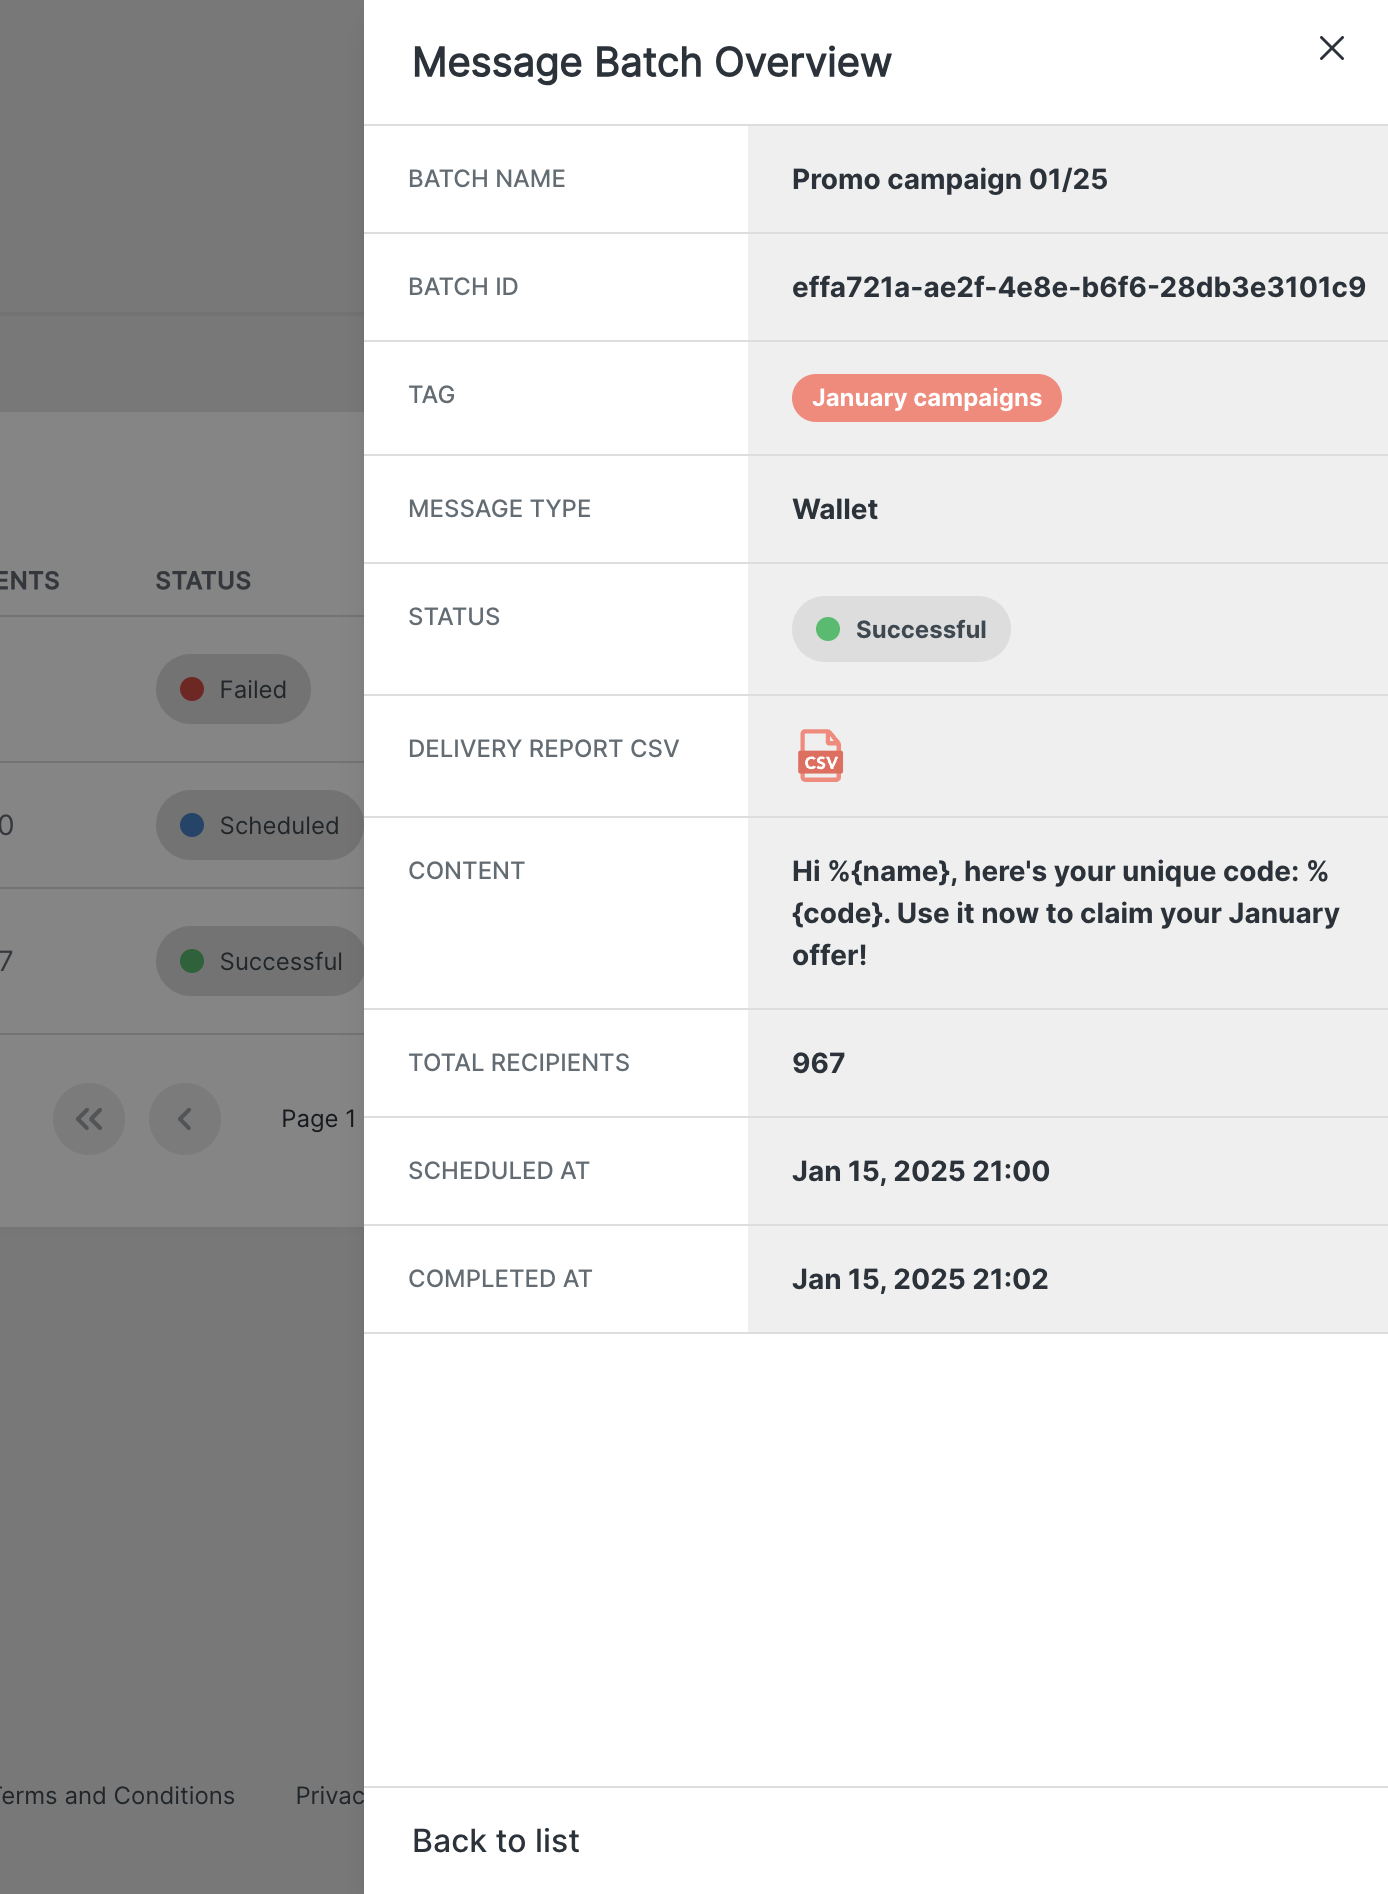
- Batch Details: Clicking the circular arrow icon will open full batch details, where you can also download a detailed delivery report, broken down by recipient and updated regularly while the messages are being sent.
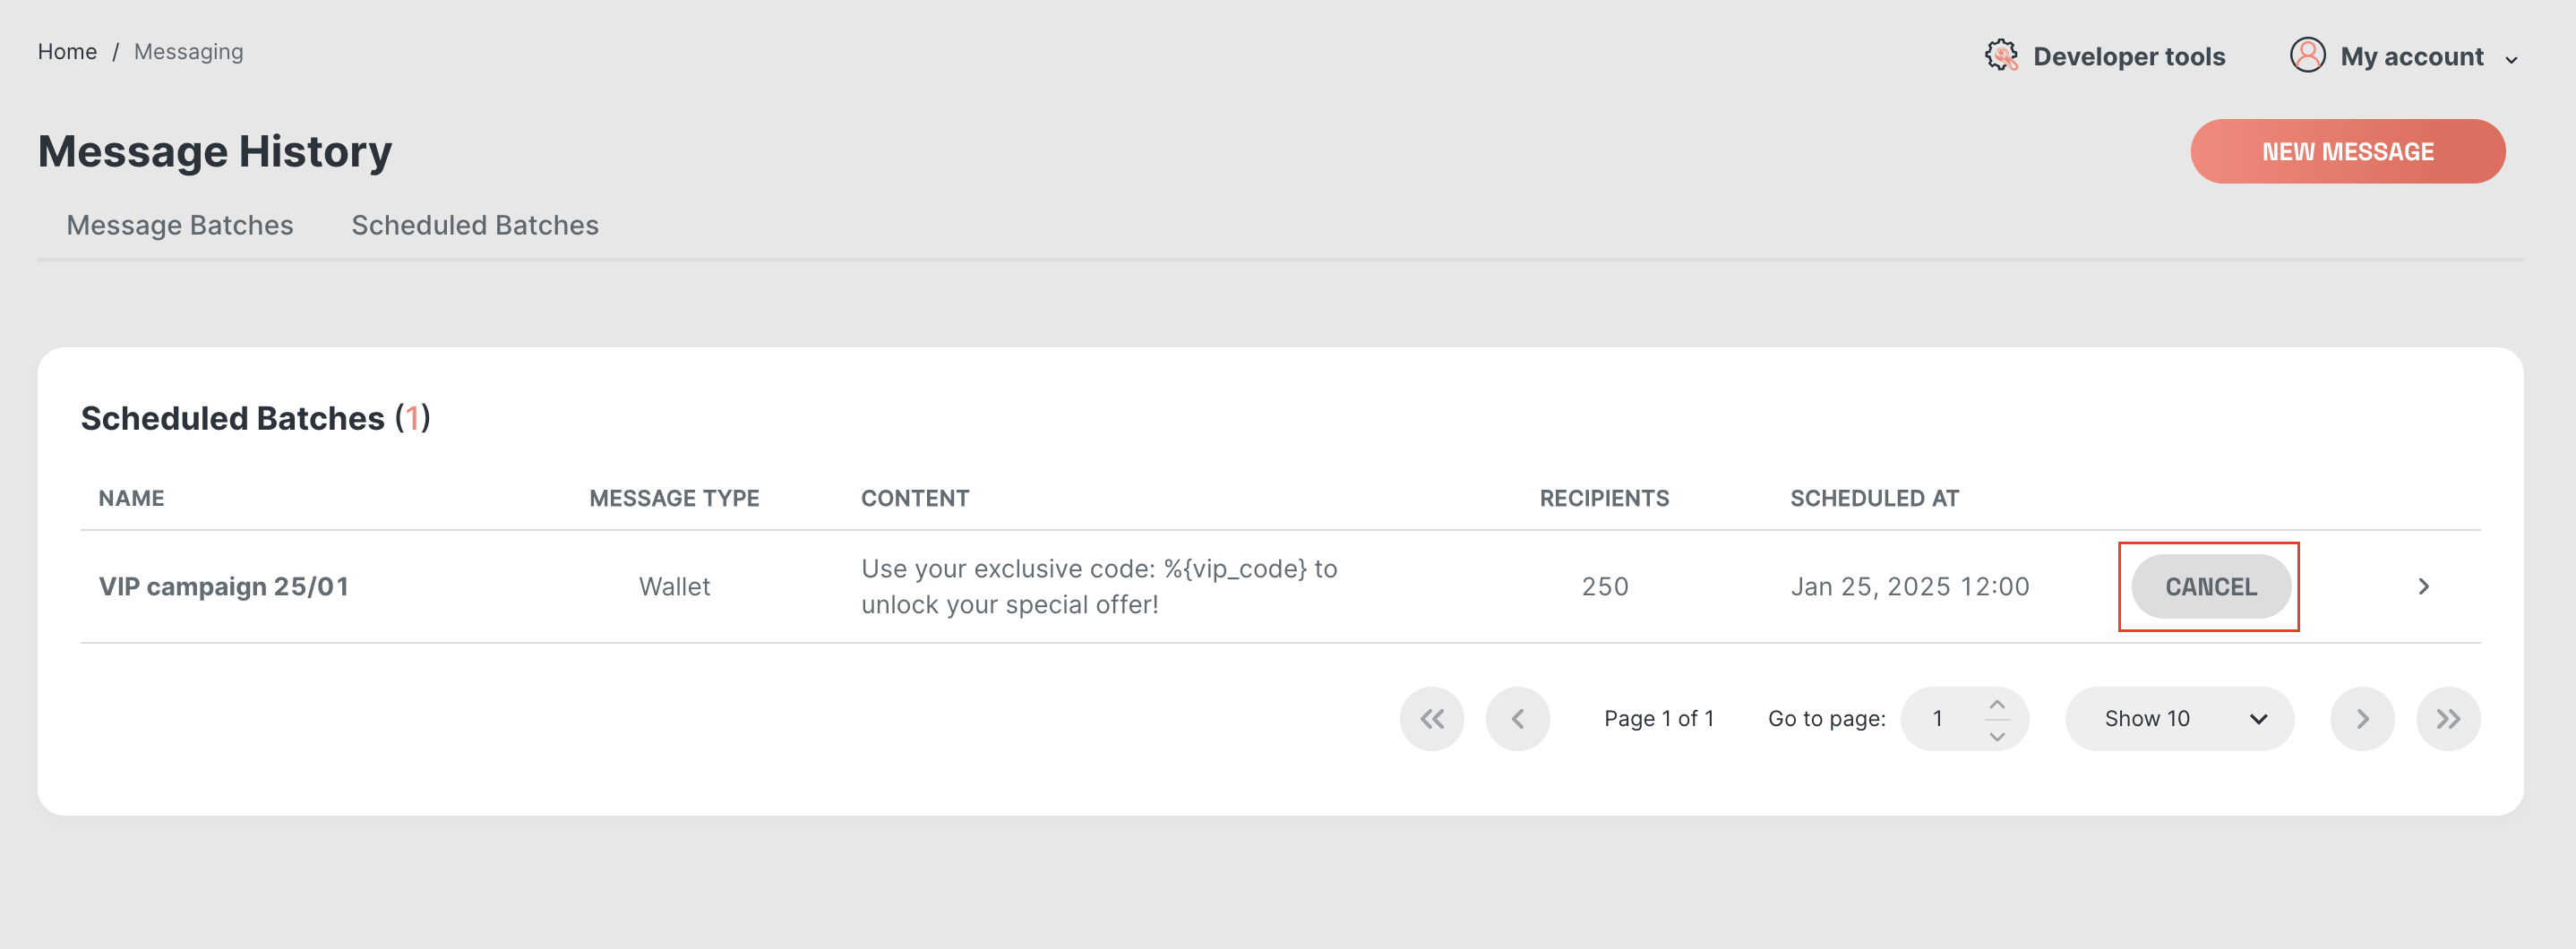
- Cancelling a scheduled batch: You can cancel a scheduled batch at any time prior to the scheduled send time. The 1 hour threshold is not applied when cancelling a scheduled batch.
FAQ
When should I use batch notifications instead of sending messages individually?
Use batch notifications when you need to send the same message to many recipients at once. Batches are more efficient, easier to track, and better suited for campaigns or large-scale updates.Can I personalise messages in batch notifications?
Yes, but only when using pass IDs or CSV uploads. Personalisation variables are not supported when targeting recipients via pass filtering.What happens if some messages fail to send?
If any errors occur during delivery, you can download an error CSV from the Message History page to see which recipients failed and why.Can I cancel a scheduled batch?
Yes. Scheduled batches can be cancelled at any time before the send time. The usual one-hour scheduling limit does not apply when cancelling.That’s everything you need to know to get started with Batch Wallet Notifications. We’d love to hear your thoughts – if you have any feedback or run into issues, let us know so we can keep improving!