> ## Documentation Index
> Fetch the complete documentation index at: https://docs.passentry.com/llms.txt
> Use this file to discover all available pages before exploring further.
# Downloading Passes
> Learn how to deliver digital passes using PassEntry’s hosted download page or by directly delivering Apple Wallet and Google Wallet passes in device-aware flows.
Once a pass is created, the next step is getting it into the user’s wallet. PassEntry offers two delivery options: using a **hosted download page** or delivering the **pass source directly**. The right approach depends on whether you know the user’s device type and where the delivery happens in your flow.
Use the hosted download page when you want a simple, device-agnostic way to share passes via a single link. Use direct pass source delivery when the user’s device is already known – for example, inside a mobile app or a device-aware web experience.
## Using PassEntry's Download Page
When creating a pass, we return a JSON object with pass attributes and timestamps. Within this object, we include a `downloadUrl`, unique to each pass, which when clicked by the end user will open a generic pass download page, a web view hosted by PassEntry on `download.passentry.com`.
As at this stage, the passholder's device type is unknown, one of the purposes of this download page is to detect the user's device and deliver either an Apple Wallet pass or Google Wallet pass. When the download page is opened on a device other than an iPhone or Android phone, it will display a QR code directing the user to the same URL, in order to direct them to open the download page on a mobile device.
Using this download page enables simple distribution of passes to your customers via a generic, dynamic link. As a best practice, we suggest putting the `downloadUrl` behind a button or redirecting the user to it at a desired point in their user journey.
### Customising the Download Page
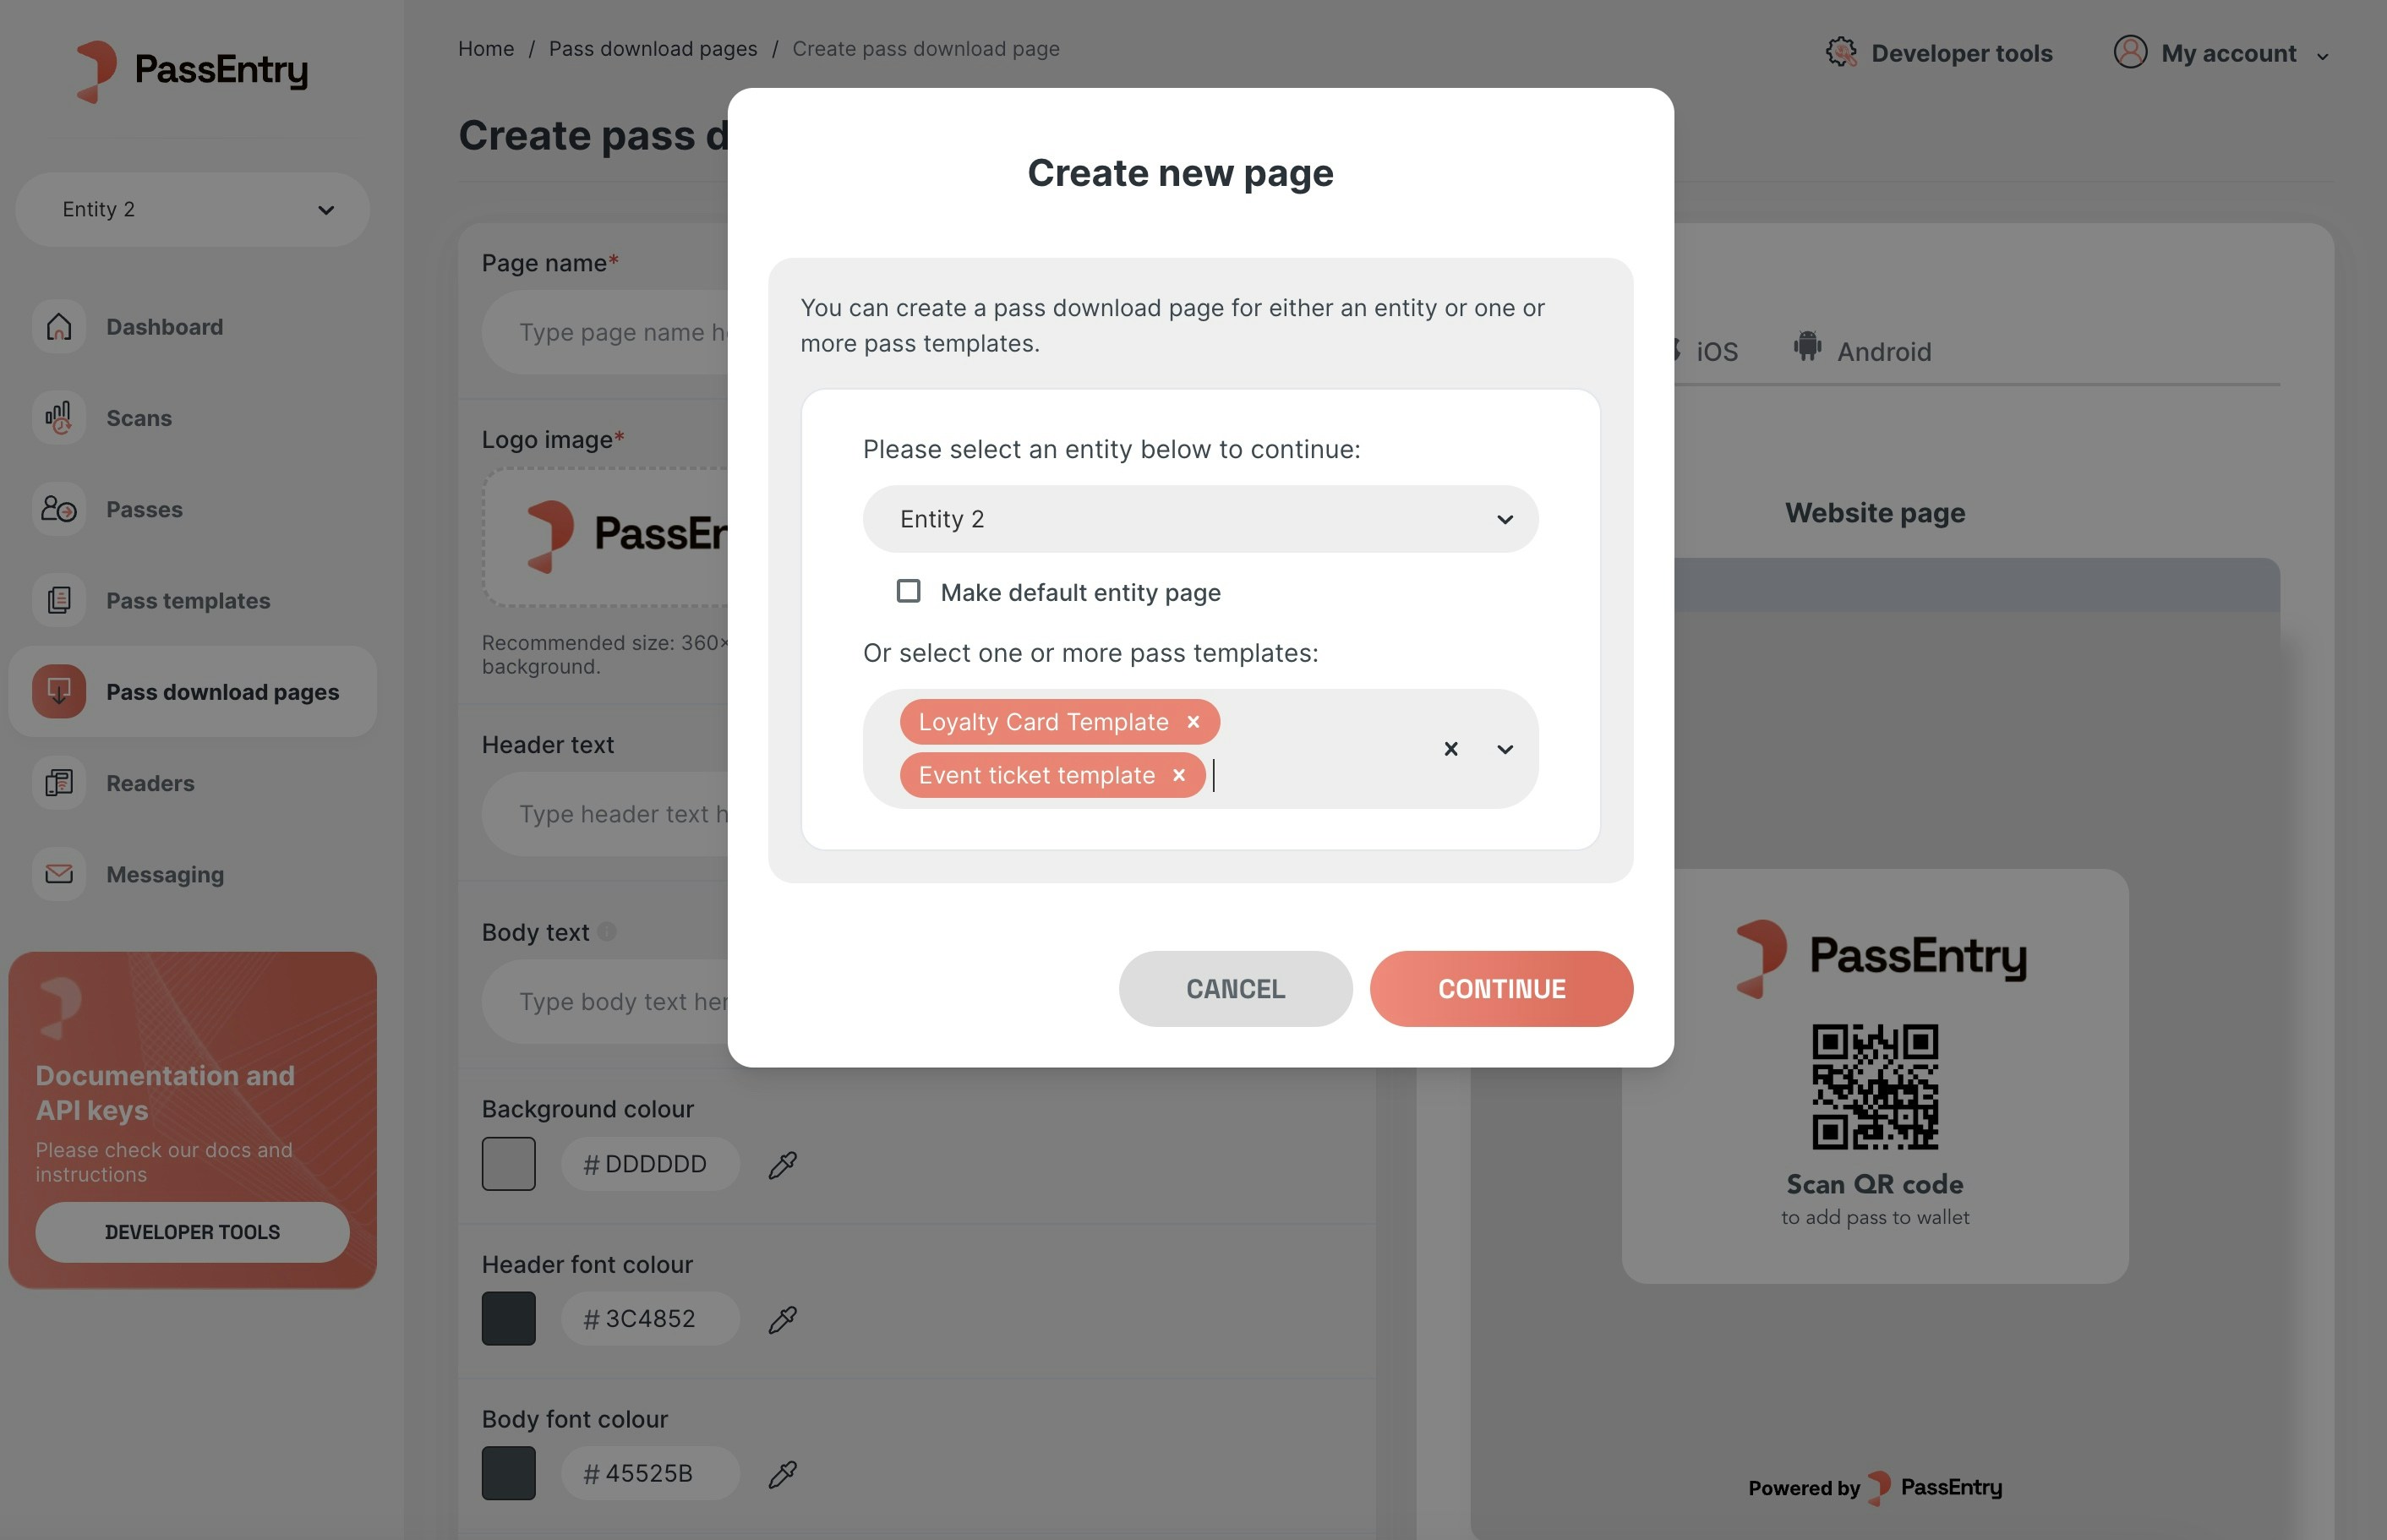
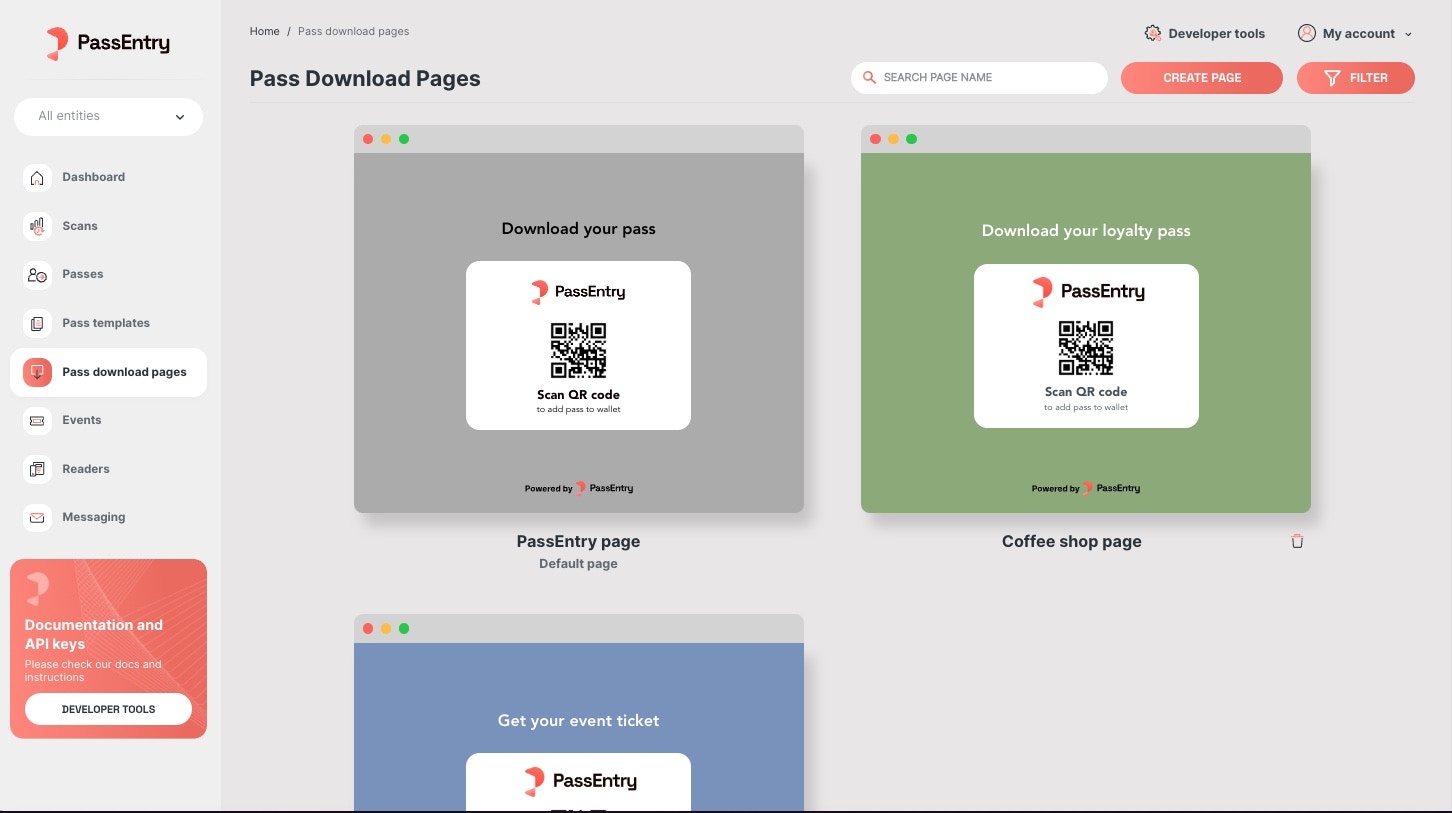
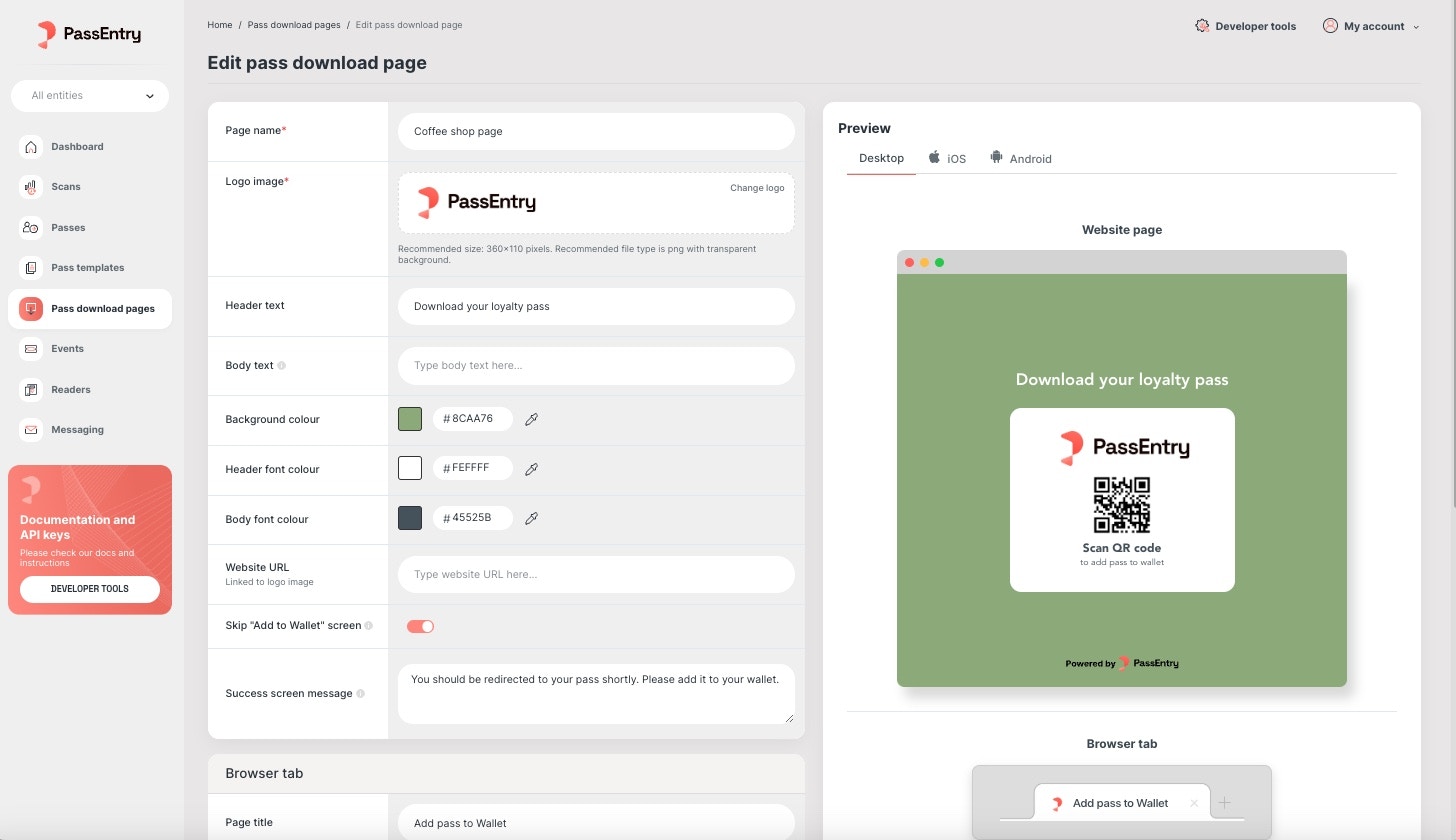
You can customise the pass download pages for either your organisation, an entity (if applicable) or one or more pass templates. The options to create, edit or delete pages are found under the *Pass download pages* tab on the PassEntry Dashboard.
Upload brand-specific images, choose custom colours, and personalise text to ensure each page closely aligns with your own platform.
Note: When a pass is downloaded, the system will display a custom page based on the following priority:
1. If a custom page exists for the pass template, that page will be shown.
2. If no template-specific page is found but a custom page exists for the associated entity, the entity page will be shown instead.
3. If neither a pass template page nor an entity page is available, your organisation's default page will be displayed.
 ## Using 'Direct' Pass Source Delivery
In some cases, use of the download page is not a viable option, such as when provisioning the pass from within an app, or when wanting to directly deliver the pass from within a web page, without redirecting the user to PassEntry's download page.
In order for this to be possible, you must know the device type when creating the pass. When delivering the pass from within an app, the device type will already be known. When delivering from a web page, there are a number of scripts that can be used to detect the device type and request the correct pass source.
Here is a sample script:
```javascript Fetching the device type theme={null}
const getMobileOS = () => {
const userAgent = navigator.userAgent || navigator.vendor || window.opera;
if (/android/i.test(userAgent)) {
return "Android";
} else if (/iPhone/i.test(userAgent)) {
return "iPhone";
}
return "Other";
};
// Example usage
const mobileOS = getMobileOS();
console.log(`This page is opened on: ${mobileOS}`);
```
Once the device is known, request and deliver the correct Pass Source.
To request the Pass Source, include the `?includePassSource` query parameter in your `POST /passes/` or `GET /passes/:id` request. This parameter accepts `apple` or `google` as options. For more details, review the [Create Pass API](/api-reference/v1/passes/create-pass) and [Get Pass API](/api-reference/v1/passes/show-pass) documentation.
If valid, the response will include the pass attributes in JSON, alongside a `passSource` object. It will only return the `passSource` object in the response if the selected pass is not currently active in a device.
The `passSource` object will contain a key, `googleDownloadUrl`, containing a unique URL, which when opened on an Android device, will prompt the user to add their pass to their Google Wallet. As the Google Wallet is linked to an individual Google Account, the user will be prompted to log in to their Google Account if they are not already logged in and to download the Google Wallet if they have not already done so.
The `googleDownloadUrl` works best when placed behind Google's "Add to Google Wallet" button. Here are the brand guidelines and assets provided by Google:
[Add to Google Wallet](https://developers.google.com/wallet/generic/resources/brand-guidelines?hl=en)
Apple requires the pass source to be delivered as a file with a `.pkpass` extension. The `passSource` object will contain a key, `appleBase64`, containing the `.pkpass` file encoded in base64. Decode the base64, save it to a file with the `.pkpass` extension, and deliver this to the user. When an iPhone detects a `.pkpass` file, it will prompt the user to add it to their Apple Wallet. Deliver the pass when the user clicks Apple's "Add to Apple Wallet" button. Here are the brand guidelines and assets provided by Apple:
[Add to Apple Wallet](https://developer.apple.com/wallet/add-to-apple-wallet-guidelines/)
## Using 'Direct' Pass Source Delivery
In some cases, use of the download page is not a viable option, such as when provisioning the pass from within an app, or when wanting to directly deliver the pass from within a web page, without redirecting the user to PassEntry's download page.
In order for this to be possible, you must know the device type when creating the pass. When delivering the pass from within an app, the device type will already be known. When delivering from a web page, there are a number of scripts that can be used to detect the device type and request the correct pass source.
Here is a sample script:
```javascript Fetching the device type theme={null}
const getMobileOS = () => {
const userAgent = navigator.userAgent || navigator.vendor || window.opera;
if (/android/i.test(userAgent)) {
return "Android";
} else if (/iPhone/i.test(userAgent)) {
return "iPhone";
}
return "Other";
};
// Example usage
const mobileOS = getMobileOS();
console.log(`This page is opened on: ${mobileOS}`);
```
Once the device is known, request and deliver the correct Pass Source.
To request the Pass Source, include the `?includePassSource` query parameter in your `POST /passes/` or `GET /passes/:id` request. This parameter accepts `apple` or `google` as options. For more details, review the [Create Pass API](/api-reference/v1/passes/create-pass) and [Get Pass API](/api-reference/v1/passes/show-pass) documentation.
If valid, the response will include the pass attributes in JSON, alongside a `passSource` object. It will only return the `passSource` object in the response if the selected pass is not currently active in a device.
The `passSource` object will contain a key, `googleDownloadUrl`, containing a unique URL, which when opened on an Android device, will prompt the user to add their pass to their Google Wallet. As the Google Wallet is linked to an individual Google Account, the user will be prompted to log in to their Google Account if they are not already logged in and to download the Google Wallet if they have not already done so.
The `googleDownloadUrl` works best when placed behind Google's "Add to Google Wallet" button. Here are the brand guidelines and assets provided by Google:
[Add to Google Wallet](https://developers.google.com/wallet/generic/resources/brand-guidelines?hl=en)
Apple requires the pass source to be delivered as a file with a `.pkpass` extension. The `passSource` object will contain a key, `appleBase64`, containing the `.pkpass` file encoded in base64. Decode the base64, save it to a file with the `.pkpass` extension, and deliver this to the user. When an iPhone detects a `.pkpass` file, it will prompt the user to add it to their Apple Wallet. Deliver the pass when the user clicks Apple's "Add to Apple Wallet" button. Here are the brand guidelines and assets provided by Apple:
[Add to Apple Wallet](https://developer.apple.com/wallet/add-to-apple-wallet-guidelines/)