> ## Documentation Index
> Fetch the complete documentation index at: https://docs.passentry.com/llms.txt
> Use this file to discover all available pages before exploring further.
# Using Third-Party Validation with PassEntry
> Learn how to configure third-party validation so your own system can control how passes are validated during scans, including custom validation logic, reader behaviour and optional loyalty updates in a single request.
PassEntry supports validating passes at physical locations using NFC or barcodes, for use cases such as event access, membership verification, ticketing and loyalty check-ins.
By default, PassEntry validates scans internally. With **third-party validation**, each scan is sent to your own system, allowing you to apply custom business logic, control reader responses and optionally update loyalty balances as part of the same validation flow.
## What is Third-Party Validation?
With **third-party validation**, your system takes full control over how passes are validated. Instead of PassEntry checking pass validity, every scan is sent to your own endpoint, where you decide the logic.
### PassEntry Internal vs. Third-Party Validation
| Feature | PassEntry Default Validation 📦 | Third-Party Validation 🔧 |
| --------------------------- | ----------------------------------------------------------------------------- | -------------------------------------------------------------------------------------- |
| **Setup** | 📦 Out-of-the-box, no setup required | 🛠️ Requires a custom validation endpoint |
| **Validation Logic** | 🔒 PassEntry validates against its own database | ⚙️ Your system defines all validation rules |
| **Scan Value Format** | 🔑 Must be pass UUID or external ID | 📜 Can contain any data or combination of values (e.g., `customerID-promoCode`) |
| **Reader Instructions** | 📡 Pre-defined reader instructions | 🎨 Full control over instructions (e.g., messages, LED colors, sounds) |
| **Scans Logging** | 📊 Yes | 📊 Yes |
| **Support for NFC/Barcode** | 📡 NFC & Barcode (only if barcode is configured as pass UUID) | 📡 NFC & Barcode |
| **Association to the pass** | 🔄 Yes | 📡 Only if `passId` provided by your endpoint |
| **Current Compatibility** | 🔗 Works with VTAP & PassEntry Reader | 🔗 Works with VTAP & PassEntry Reader |
| **Loyalty Management** | ✨ Automatically updates points or stamps, and sends notifications if included | 🎯 Full control – your endpoint must handle loyalty updates and send any notifications |
## When to Use Third-Party Validation
Use third-party validation when you need full control over validation logic, such as enforcing custom access rules, validating external identifier or updating loyalty balances based on business-specific conditions.
If you do not need custom logic, PassEntry’s default validation is recommended as it requires no setup and works out of the box.
## How to Enable Third-Party Validation
To start using third-party validation, follow these simple steps:
### 1. Ensure You Have a Reader Set Up
Third-party validation is currently supported **only on PassEntry readers**. If you haven’t set up a reader yet, [follow this guide](../passentry-reader-app/guide) to do so.
### 2. Update Your Reader Configuration
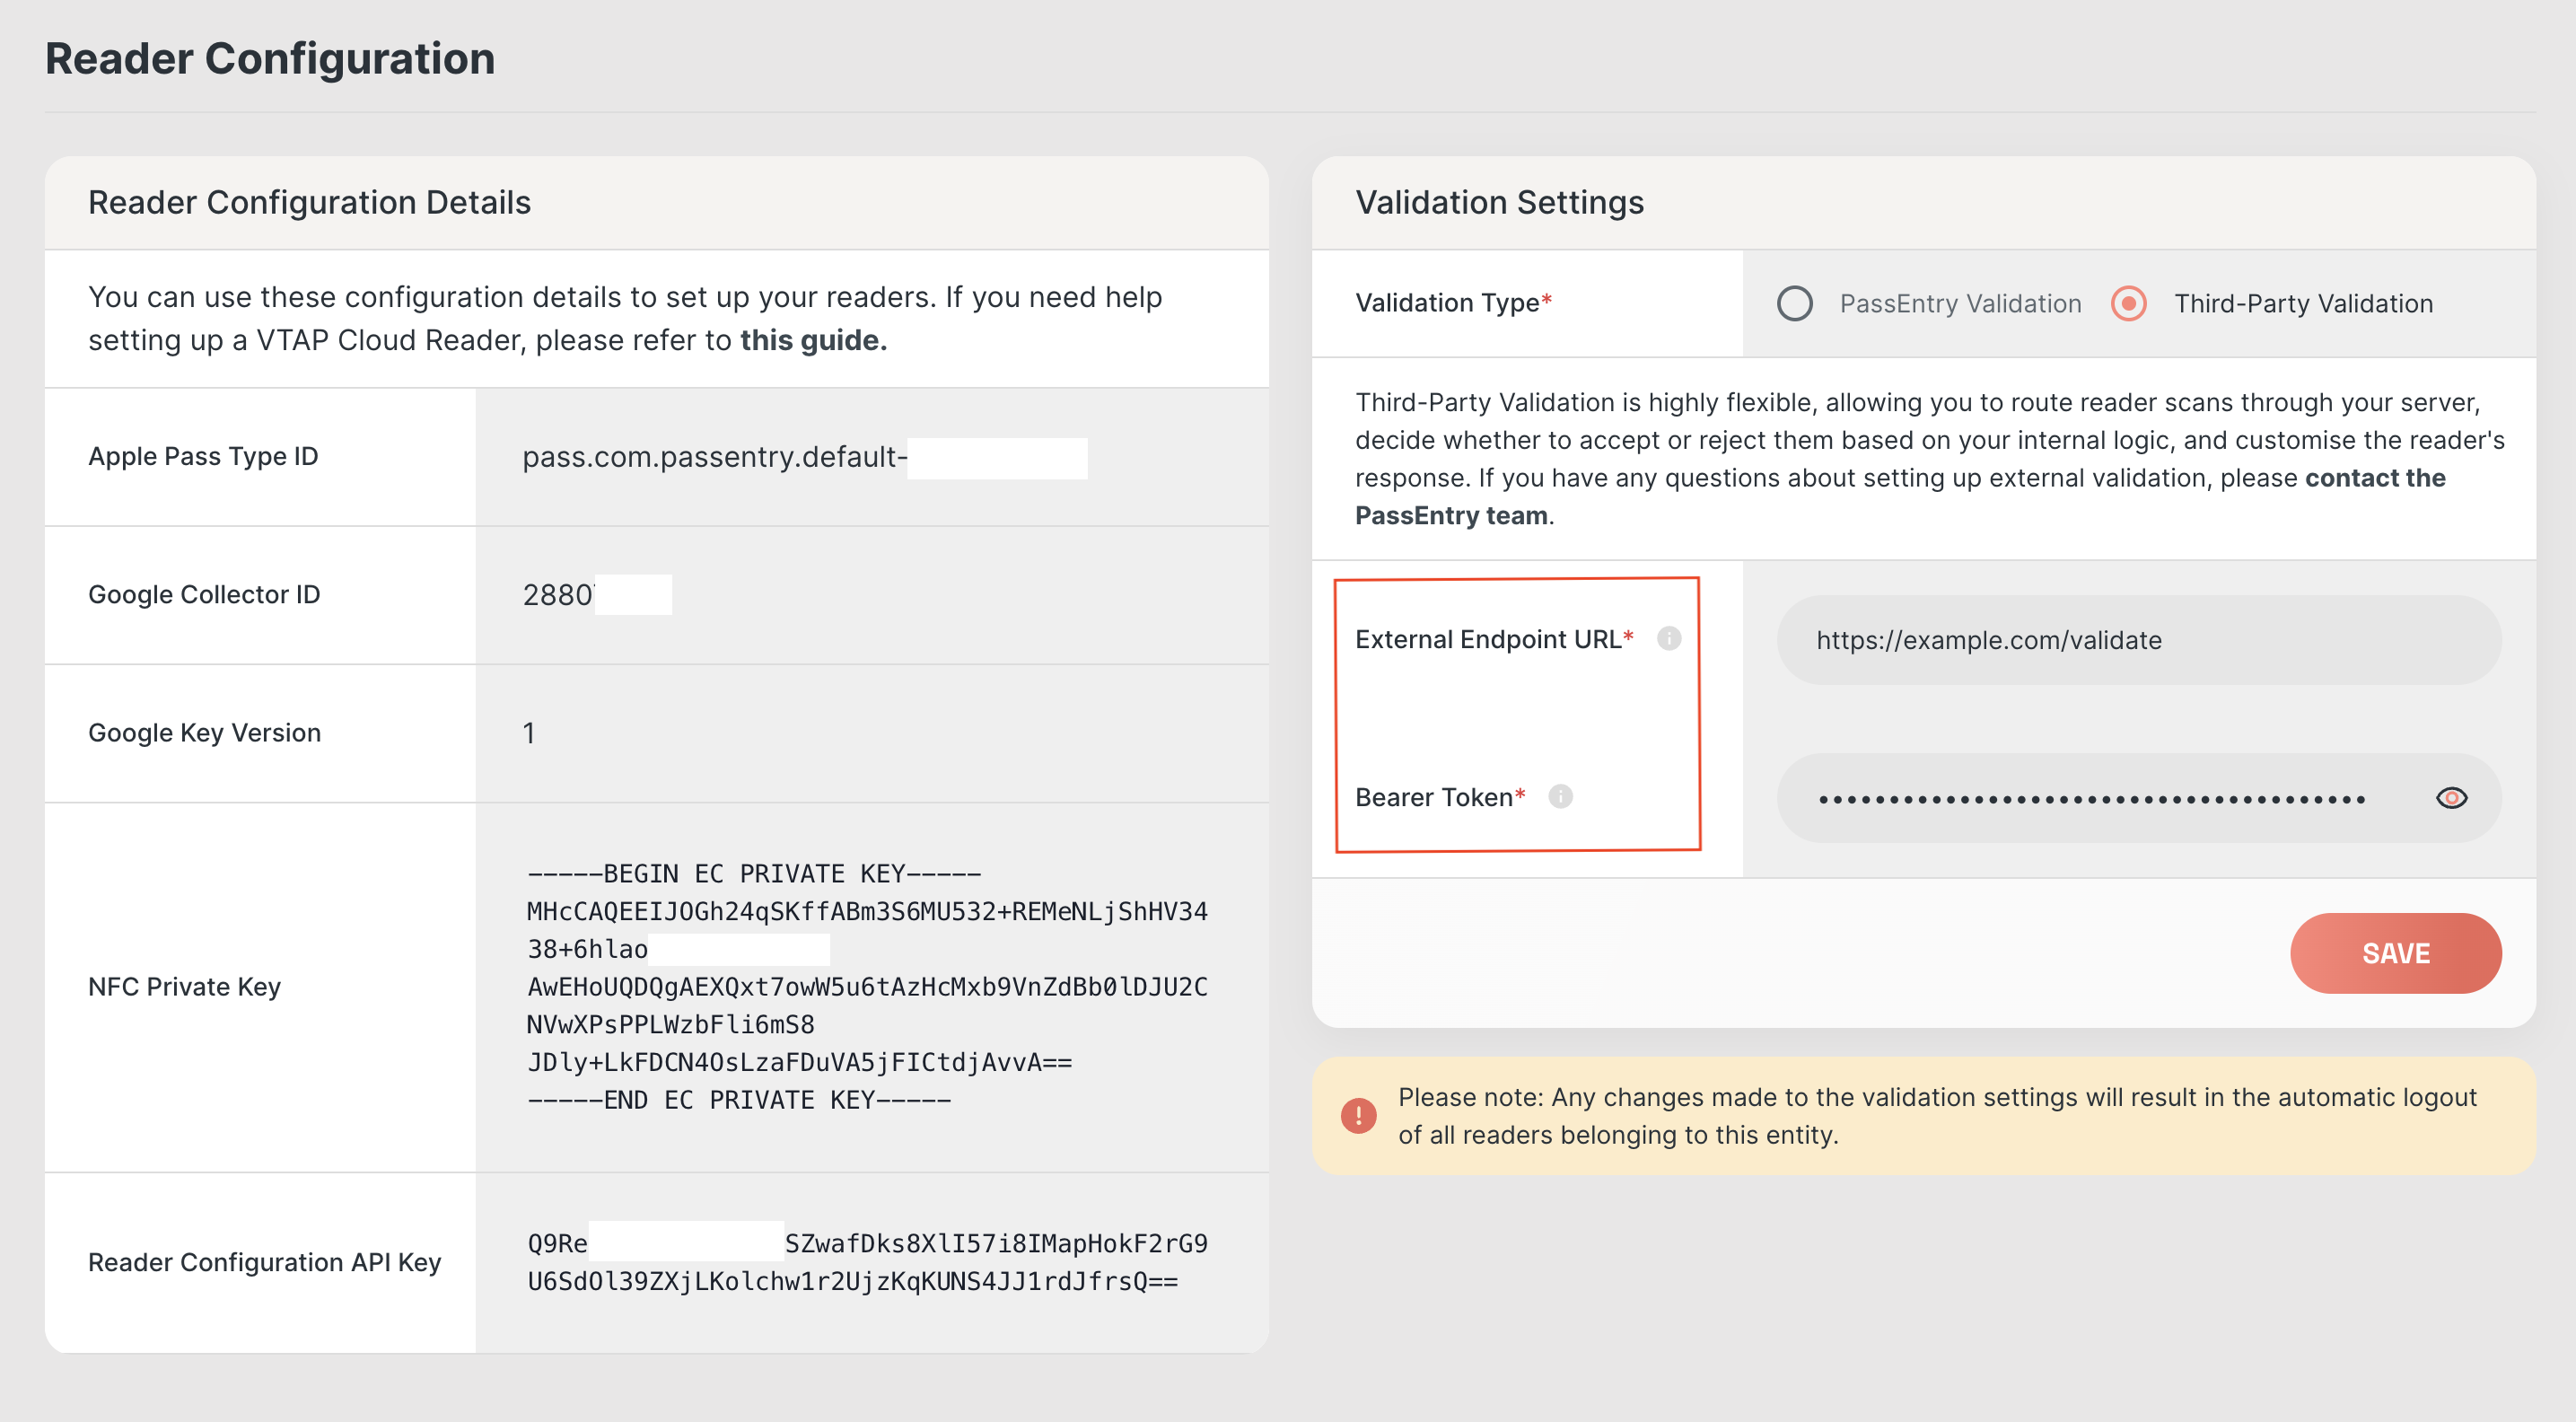
1. **Go to** **PassEntry Dashboard** → **Readers** → [**Reader Configuration**](https://app.passentry.com/readers/reader-configuration).
2. Find the **Validation Settings** section.
3. Change the validation type to **Third-Party**.
4. Enter an HTTPS URL of your **third-party validation endpoint** (this is where PassEntry will send scans for validation).
5. Include a **Bearer token** (this is a token that the reader will send to your endpoint to authenticate itself).
 ### 3. Apply Changes & Activate Third-Party Validation
* Once you update the settings, the PassEntry reader will **log out** automatically and VTAP reader's configuration will be automatically updated.
* On the next login/reboot, it will **use the new validation settings**, sending all scans to your third-party endpoint.
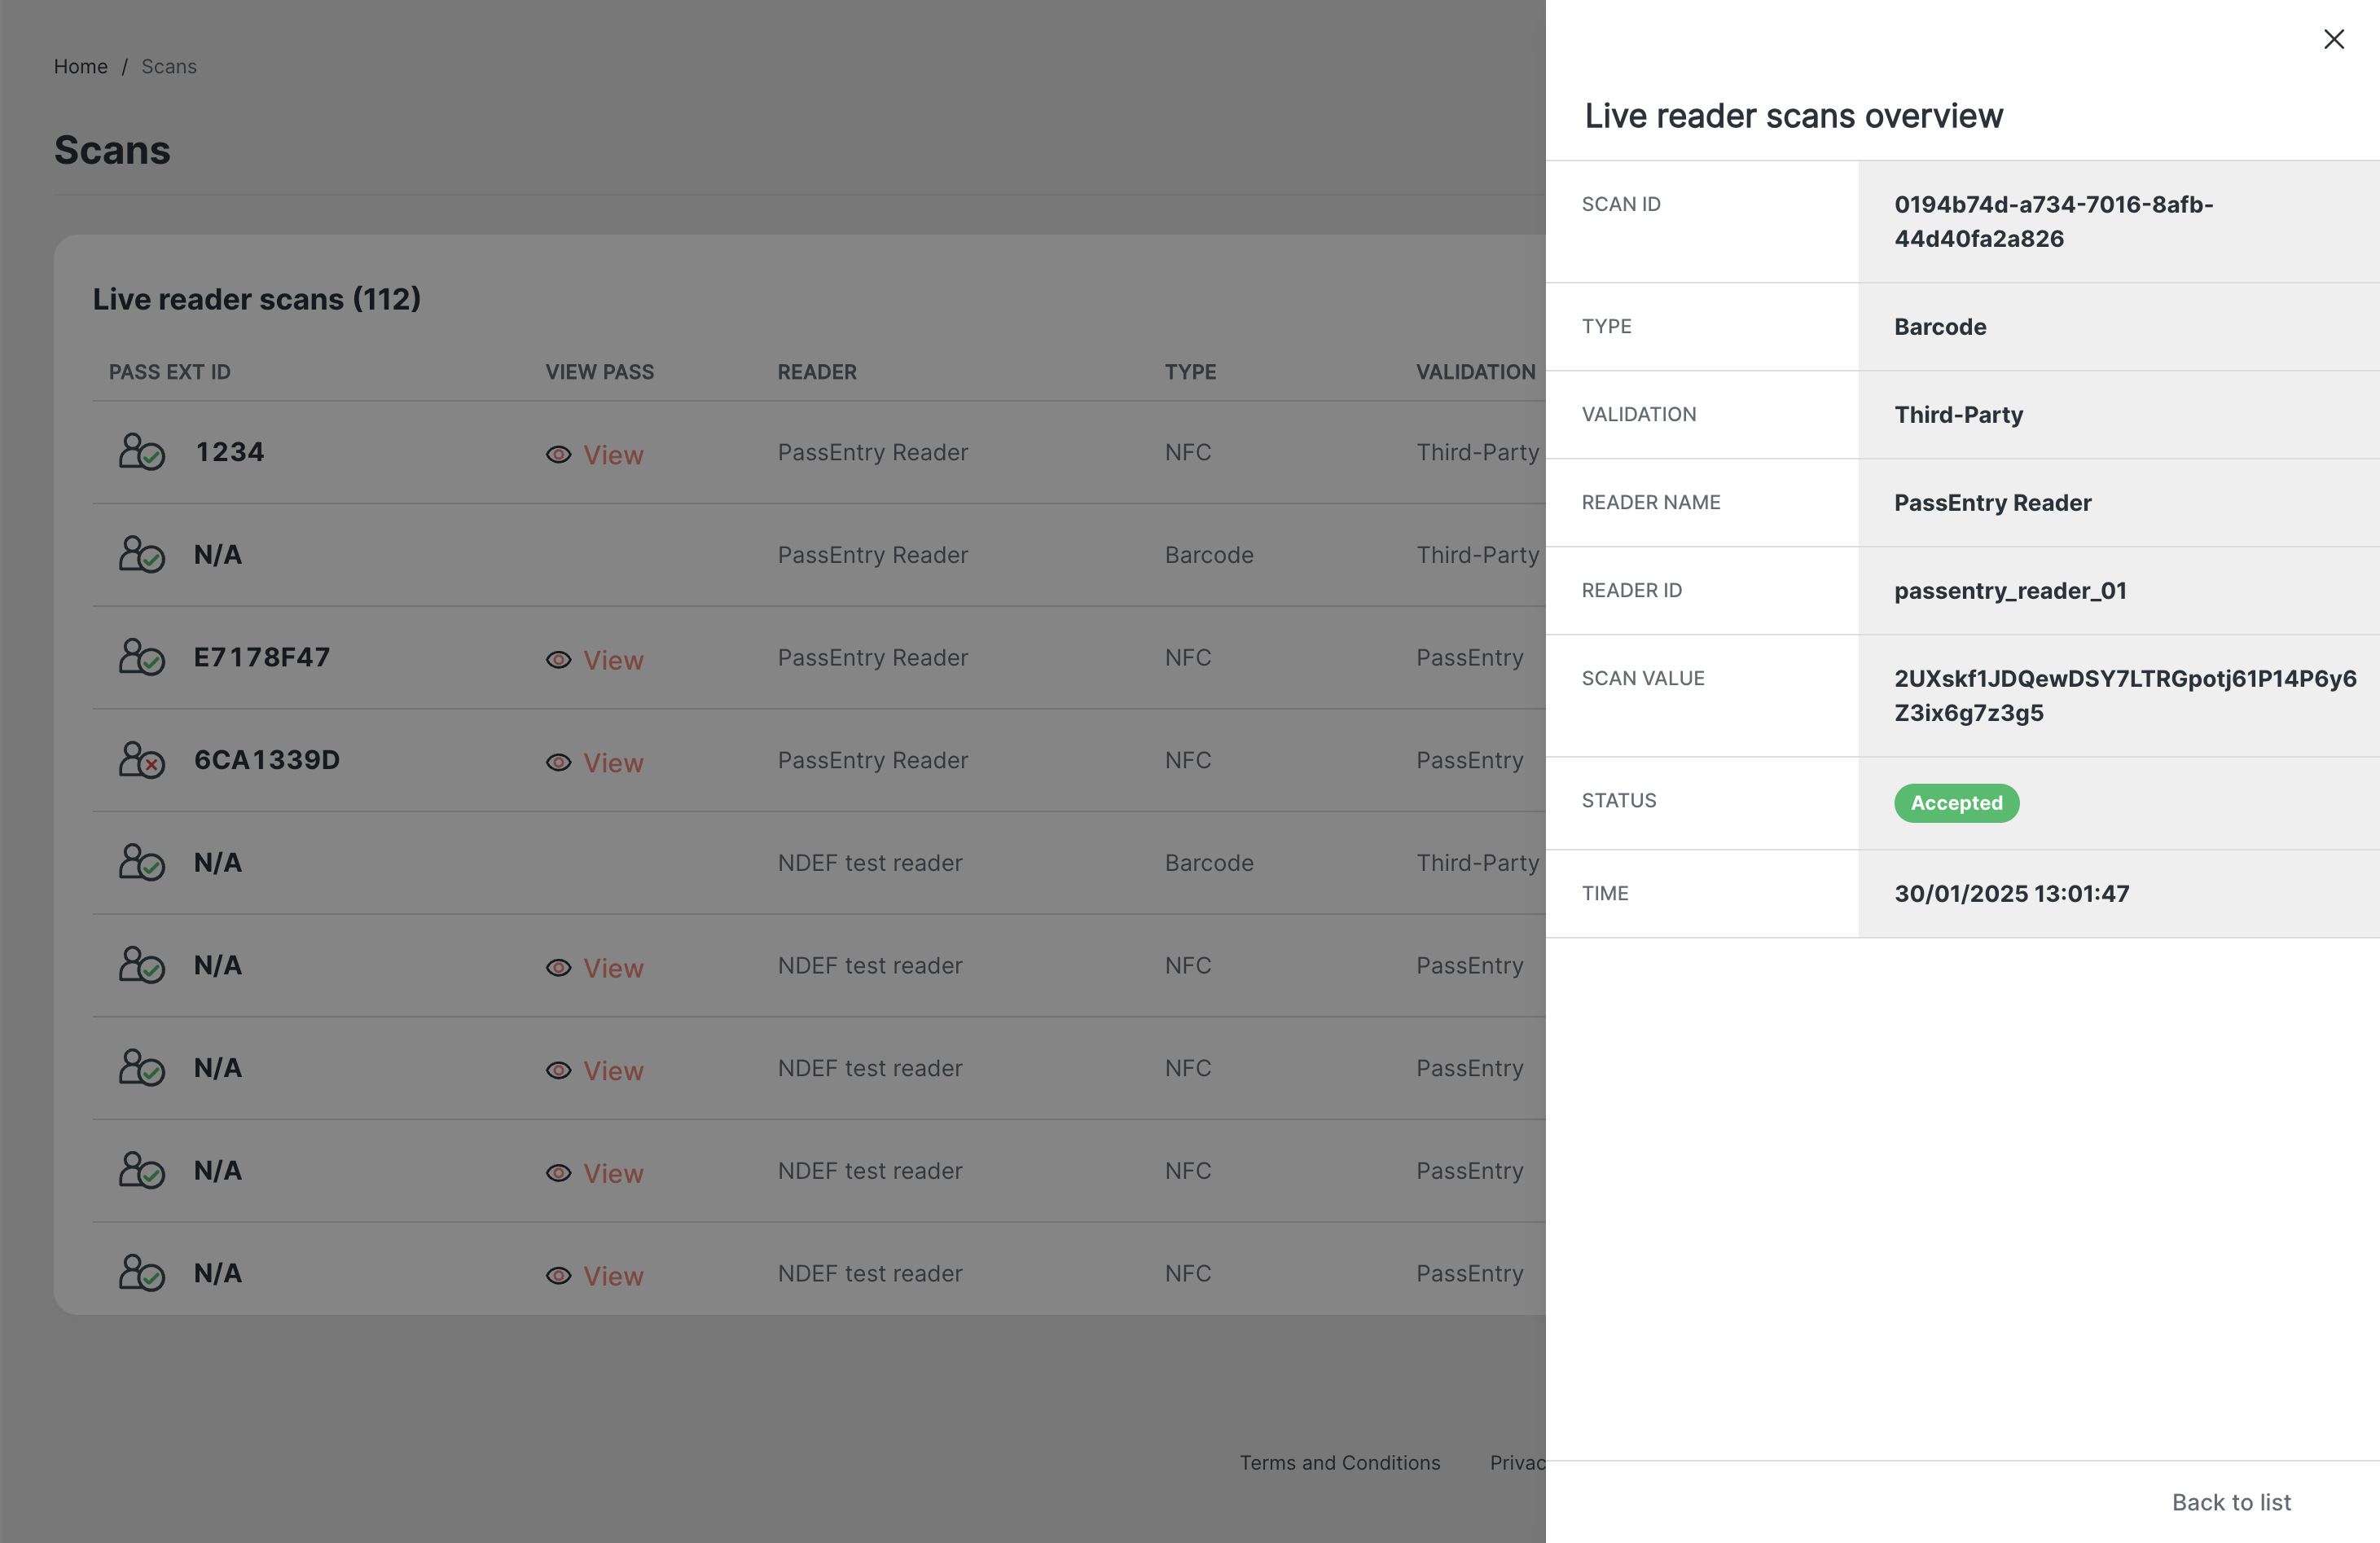
* After validation, **scans will still be logged in PassEntry** for tracking and reporting (only on PassEntry readers).
### 3. Apply Changes & Activate Third-Party Validation
* Once you update the settings, the PassEntry reader will **log out** automatically and VTAP reader's configuration will be automatically updated.
* On the next login/reboot, it will **use the new validation settings**, sending all scans to your third-party endpoint.
* After validation, **scans will still be logged in PassEntry** for tracking and reporting (only on PassEntry readers).
 ## How It Works
1. A pass is scanned using a **PassEntry reader** or **VTAP reader** (via NFC or barcode).
2. Instead of PassEntry validating the pass, the scan is **sent to your third-party endpoint**.
3. Your system **processes the validation** using custom business logic.
4. The reader receives a **response** from your system and displays any necessary instructions (e.g., “Access Granted” or “Invalid Ticket”).
5. The scan is logged in PassEntry for visibility and reporting (only on PassEntry readers).
## Third-Party Endpoint Structure
Your custom validation endpoint must be able to **receive scan data** and **respond with validation results**.
### Reader Request Format
#### PassEntry Reader
```json theme={null}
{
"scan": {
"scanValue": "some-scan-value",
"readerId": "passentry_reader_id",
"scanType": "nfc",
"loyalty": {
"balance": -10,
"message": "You have redeemed 10 points"
}
}
}
```
The value read from the NFC tag or barcode
Unique identifier of the PassEntry reader
Type of scan performed. Can be either `"nfc"` or `"barcode"`
Optional. Object containing loyalty information.
Loyalty points to add or subtract from the user's balance. Can't be used together with `balanceOverride`.
Optional. Override the balance of the loyalty points. Can't be used together with `balance`.
Optional. A notification message to send to the user.
#### VTAP Reader
```json theme={null}
{
"scan": {
"scanValue": "some-scan-value",
"readerId": "CC123456",
"readerType": "VTAP",
"scanData": {
"IP": "Local IP of device",
"location": "Reader Location",
"passtype": "A",
"payload": "d9ae223c9e6cd57e18f3f61b6198cce756de8b2b",
"rdrparam1": "Optional Reader Info 1",
"rdrparam2": "Optional Reader Info 2",
"serialno": "CC123459",
"SSID": "Connected WiFi"
}
}
}
```
The value read from the NFC tag or barcode
Unique identifier of the VTAP reader
Type of reader
Additional data about the scan from the VTAP reader.
### Your Endpoint Response Format
#### PassEntry Reader
```json theme={null}
{
"validationResponse": {
"status": "failed",
"statusDetail": "Subscription expired",
"passId": "65844fnrjkfjfkel4h4j23",
"readerInstructions": {
"message": "Sorry, we can't let you in"
}
}
}
```
Must be either `"successful"` or `"failed"` to indicate validation result
Optional. Human-readable explanation of the validation result, especially useful for failed validations
Optional. The pass identifier if applicable. For example, if `scanValue` includes a pass `ext_id` and promo code (e.g., `123456-HELLO10`), your endpoint can decode the pass `ext_id` and use it as `passId` to associate the scan with a specific pass.
Optional. Instructions for the reader to display to the user (e.g., messages, future support for LED colors, sounds, etc.)
Message to display on the reader screen
#### VTAP Reader
```json theme={null}
{
"validationResponse": {
"status": "failed",
"statusDetail": "Subscription expired",
"passId": "65844fnrjkfjfkel4h4j23",
"readerInstructions": {
"VTAPaction": {
"led": "?LEDR 00FF00,100,100,3",
"beep": "?BEEPR 50,50,2",
"message": "Sorry, we can't let you in",
"success": false
}
}
}
}
```
Must be either `"successful"` or `"failed"` to indicate validation result
Optional. Human-readable explanation of the validation result, especially useful for failed validations
Optional. The pass identifier if applicable. For example, if `scanValue` includes a pass `ext_id` and promo code (e.g., `123456-HELLO10`), your endpoint can decode the pass `ext_id` and use it as `passId` to associate the scan with a specific pass.
Optional. Instructions for the reader to display to the user (e.g., messages, future support for LED colors, sounds, etc.)
Optional. Instructions for the VTAP reader (e.g. LED colors, sounds, etc.)
LED color to display
Beep sound to play
Message. Currently not supported
Whether the validation was successful
For more information on VTAP actions, see the [VTAP API documentation](https://www.vtapnfc.com/downloads/VTAP_Commands_Reference_Guide.pdf).
## How It Works
1. A pass is scanned using a **PassEntry reader** or **VTAP reader** (via NFC or barcode).
2. Instead of PassEntry validating the pass, the scan is **sent to your third-party endpoint**.
3. Your system **processes the validation** using custom business logic.
4. The reader receives a **response** from your system and displays any necessary instructions (e.g., “Access Granted” or “Invalid Ticket”).
5. The scan is logged in PassEntry for visibility and reporting (only on PassEntry readers).
## Third-Party Endpoint Structure
Your custom validation endpoint must be able to **receive scan data** and **respond with validation results**.
### Reader Request Format
#### PassEntry Reader
```json theme={null}
{
"scan": {
"scanValue": "some-scan-value",
"readerId": "passentry_reader_id",
"scanType": "nfc",
"loyalty": {
"balance": -10,
"message": "You have redeemed 10 points"
}
}
}
```
The value read from the NFC tag or barcode
Unique identifier of the PassEntry reader
Type of scan performed. Can be either `"nfc"` or `"barcode"`
Optional. Object containing loyalty information.
Loyalty points to add or subtract from the user's balance. Can't be used together with `balanceOverride`.
Optional. Override the balance of the loyalty points. Can't be used together with `balance`.
Optional. A notification message to send to the user.
#### VTAP Reader
```json theme={null}
{
"scan": {
"scanValue": "some-scan-value",
"readerId": "CC123456",
"readerType": "VTAP",
"scanData": {
"IP": "Local IP of device",
"location": "Reader Location",
"passtype": "A",
"payload": "d9ae223c9e6cd57e18f3f61b6198cce756de8b2b",
"rdrparam1": "Optional Reader Info 1",
"rdrparam2": "Optional Reader Info 2",
"serialno": "CC123459",
"SSID": "Connected WiFi"
}
}
}
```
The value read from the NFC tag or barcode
Unique identifier of the VTAP reader
Type of reader
Additional data about the scan from the VTAP reader.
### Your Endpoint Response Format
#### PassEntry Reader
```json theme={null}
{
"validationResponse": {
"status": "failed",
"statusDetail": "Subscription expired",
"passId": "65844fnrjkfjfkel4h4j23",
"readerInstructions": {
"message": "Sorry, we can't let you in"
}
}
}
```
Must be either `"successful"` or `"failed"` to indicate validation result
Optional. Human-readable explanation of the validation result, especially useful for failed validations
Optional. The pass identifier if applicable. For example, if `scanValue` includes a pass `ext_id` and promo code (e.g., `123456-HELLO10`), your endpoint can decode the pass `ext_id` and use it as `passId` to associate the scan with a specific pass.
Optional. Instructions for the reader to display to the user (e.g., messages, future support for LED colors, sounds, etc.)
Message to display on the reader screen
#### VTAP Reader
```json theme={null}
{
"validationResponse": {
"status": "failed",
"statusDetail": "Subscription expired",
"passId": "65844fnrjkfjfkel4h4j23",
"readerInstructions": {
"VTAPaction": {
"led": "?LEDR 00FF00,100,100,3",
"beep": "?BEEPR 50,50,2",
"message": "Sorry, we can't let you in",
"success": false
}
}
}
}
```
Must be either `"successful"` or `"failed"` to indicate validation result
Optional. Human-readable explanation of the validation result, especially useful for failed validations
Optional. The pass identifier if applicable. For example, if `scanValue` includes a pass `ext_id` and promo code (e.g., `123456-HELLO10`), your endpoint can decode the pass `ext_id` and use it as `passId` to associate the scan with a specific pass.
Optional. Instructions for the reader to display to the user (e.g., messages, future support for LED colors, sounds, etc.)
Optional. Instructions for the VTAP reader (e.g. LED colors, sounds, etc.)
LED color to display
Beep sound to play
Message. Currently not supported
Whether the validation was successful
For more information on VTAP actions, see the [VTAP API documentation](https://www.vtapnfc.com/downloads/VTAP_Commands_Reference_Guide.pdf).