> ## Documentation Index
> Fetch the complete documentation index at: https://docs.passentry.com/llms.txt
> Use this file to discover all available pages before exploring further.
# Connecting Your POS to a PassEntry Terminal
> Learn how to connect your point-of-sale system to a PassEntry terminal so customers can tap or scan their wallet pass for loyalty points, membership and event access, while you keep your existing payment hardware.
A **PassEntry terminal** is a customer-facing device running the PassEntry Reader app in *Customer mode*. It can be a countertop payment terminal or card reader such as a PAX, Sunmi or Urovo device, a tablet, or a phone. It reads Apple Wallet and Google Wallet passes over NFC or QR, shows the customer what is happening, and hands the pass to **your** POS. Your POS decides what to do with it and calls the PassEntry API to validate the pass, add points or redeem points.
Your POS pairs with a terminal by its ID, tells it when to read a pass and receives the pass back. Nothing about your checkout changes: your existing payment device still takes the payment.
## How It Works
```mermaid theme={null}
flowchart LR
POS["Your POS
(backend)"]
Relay["PassEntry relay"]
Term["PassEntry terminal
(customer-facing)"]
API["PassEntry API"]
POS <-- "WebSocket" --> Relay
Relay <-- "WebSocket" --> Term
POS -- "HTTPS" --> API
style Term fill:#FF8477,stroke:#EC6759,color:#fff
style API fill:#3B4851,stroke:#3B4851,color:#fff
```
The terminal connects to the PassEntry relay and registers its **Terminal ID**, a 6-character code shown on the device.
Your POS signs in to the PassEntry API with a Reader ID and password, exactly as the PassEntry Reader app does, and keeps that session alive with a heartbeat.
Your POS connects to the relay and pairs with the terminal by Terminal ID.
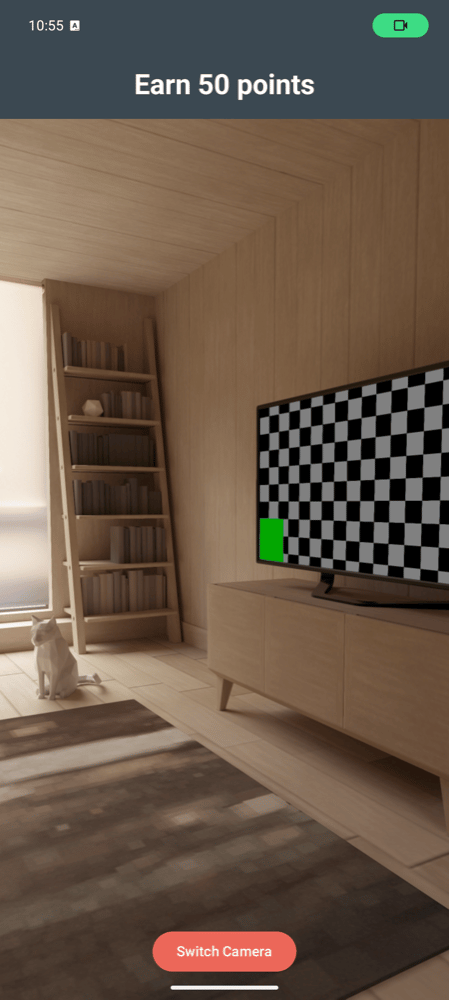
When a customer is ready, your POS sends `start_capture`. The terminal shows a scan screen such as "Earn 50 points".
The terminal reads the pass and sends `captured` with the pass identifier to your POS.
Your POS calls the [Create scan](/api-reference/v1/scans/create-scan) endpoint to validate the pass, add points or redeem points, then sends `result`. The terminal shows a success or failure screen and returns to idle. Every API call the integration uses is listed in [The API calls behind the integration](#5-the-api-calls-behind-the-integration).
The relay only forwards messages. It never reads passes, awards points or validates anything. Your POS owns the business logic.
| Flow | Use it for | What the customer sees |
| - | - | - |
| **Scan** | Event access, membership check-in, stamp cards | A scan prompt, then a success or "invalid pass" screen |
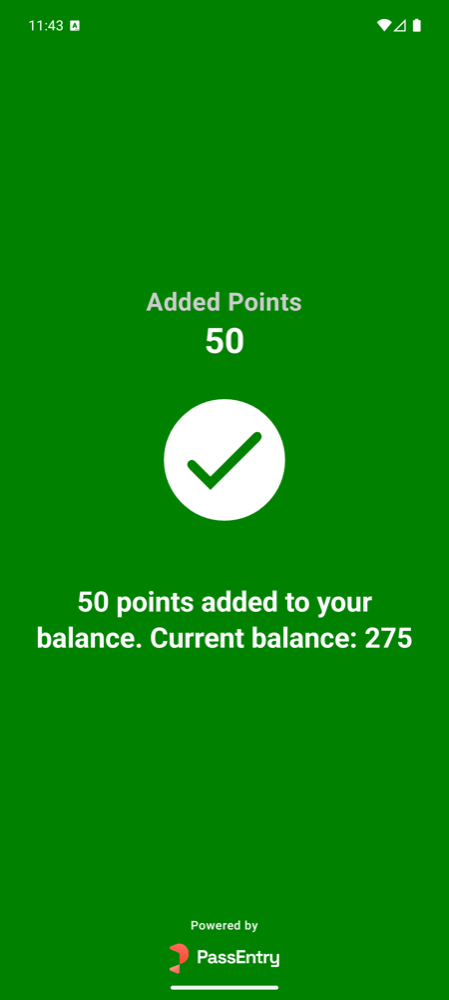
| **Accrue** | Adding loyalty points after a purchase | "Earn 50 points" over the scan prompt, then "Added Points 50" with your message |
| **Redeem** | Spending loyalty points on a reward or discount | "Redeem 50 points" over the scan prompt, then "Points Redeemed 50" with your message |
Want to see it working before reading the detail? Jump to the [example](#example). It logs in, pairs with a terminal, asks for a QR scan and adds 10 points in under 80 lines of JavaScript.
## Before You Start
* A **PassEntry Reader** for each till, created in the [Readers](https://app.passentry.com/readers) page of the Dashboard. Give it a name, a Reader ID such as `till-04`, a password, and enable the modes you plan to use (Scan, Redeem, Adding). Your POS logs in with these credentials.
* A device to act as the terminal: a payment terminal or card reader with the PassEntry Reader app available in its app store, or any tablet or phone with NFC or a camera.
* A backend service in your POS that can hold a WebSocket connection and make HTTPS calls. Connect from a server, not from a browser page.
* **A pass identifier to test against**, for a pass with loyalty enabled on its template. Make a
test pass in the [Dashboard](https://app.passentry.com) and note its UUID or external ID. Get it
before you write any code: a reader session cannot look passes up or create one, so without an
identifier you can sign in, pair a terminal and arm a capture, and still have nothing to complete
a single API call with. If someone else runs the account, ask them for one.
**A reader's configuration decides what your interface should offer.** The login response reports
it: `scanEnabled`, `addPointsEnabled` and `redeemEnabled` for what the reader may do, and
`qrEnabled` and `nfcEnabled` for how it can read a pass. Read all five at sign-in and show only
what applies.
The first three are yours to enforce, one per operation: `scanEnabled` for a plain Scan,
`addPointsEnabled` for an Accrue, `redeemEnabled` for a Redeem. Reading a balance is not gated by
any of them. The API does not refuse a call because a mode is switched off, so a reader with
`addPointsEnabled: false` can still accrue and get an ordinary `200`. The two read flags are
enforced by the terminal.
A reader is signed in from one place at a time, and each login invalidates the previous session, so
give the POS its own reader rather than sharing one with a physical PassEntry Reader device.
## Quickstart
Everything below is the full guide. If you would rather see it working first, these four commands
are the whole integration with nothing left out. They need a Reader ID, its password, and a pass
identifier (see [Before You Start](#before-you-start)). No terminal is involved.
Every field shown is required. Three of them are easy to miss: the body must be wrapped in
`passentry_reader`, and a scan needs both `readerId` and `scanType`.
```bash 1. Sign in theme={null}
curl -X POST https://api.passentry.com/api/v1/readers/login \
-H "Content-Type: application/json" \
-d '{ "passentry_reader": { "uuid": "YOUR_READER_ID", "password": "YOUR_PASSWORD" } }'
# → data.attributes.token use as the Bearer token below
# → data.attributes.scanEnabled / addPointsEnabled / redeemEnabled
# what this reader is set up for: show only those actions
```
```bash 2. Look up a pass theme={null}
curl https://api.passentry.com/api/v1/loyalty/YOUR_PASS_ID \
-H "Authorization: Bearer YOUR_TOKEN"
# → meta.loyalty.balance the number to show the customer
```
```bash 3. Add points theme={null}
curl -X POST https://api.passentry.com/api/v1/scans \
-H "Authorization: Bearer YOUR_TOKEN" \
-H "Content-Type: application/json" \
-d '{
"scan": {
"readerId": "YOUR_READER_ID",
"passId": "YOUR_PASS_ID",
"scanType": "barcode",
"loyalty": { "balance": 5, "message": "You earned 5 points." }
}
}'
# → validationResponse.status "successful" or "failed"
# → validationResponse.readerInstructions.message show this to the customer
```
```bash 4. Redeem points theme={null}
curl -X POST https://api.passentry.com/api/v1/scans \
-H "Authorization: Bearer YOUR_TOKEN" \
-H "Content-Type: application/json" \
-d '{
"scan": {
"readerId": "YOUR_READER_ID",
"passId": "YOUR_PASS_ID",
"scanType": "barcode",
"loyalty": { "balance": -5, "message": "You redeemed 5 points." }
}
}'
# a negative balance redeems; too few points returns 422 with the current balance
```
Keep the session alive with a heartbeat every 5 minutes, or the token expires after 30
([Send a heartbeat](#send-a-heartbeat-every-5-minutes)). Read the pass identifier off a customer's
phone with a PassEntry terminal by adding the relay, which is what the rest of this guide covers.
## 1. Set Up the Terminal
Install the **PassEntry NFC/QR Pass Scanner** app from the Apple App Store, Google Play Store, PAX MAXSTORE, Sunmi App Store or Urovo App Store.
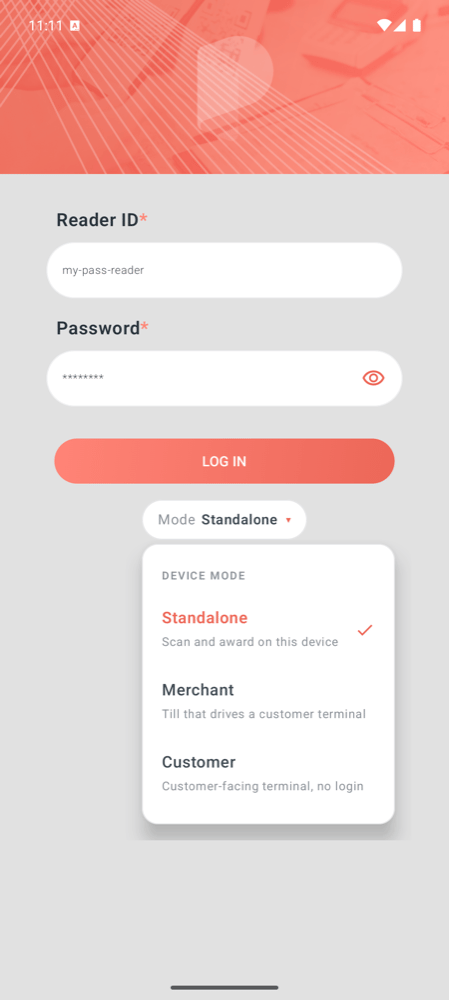
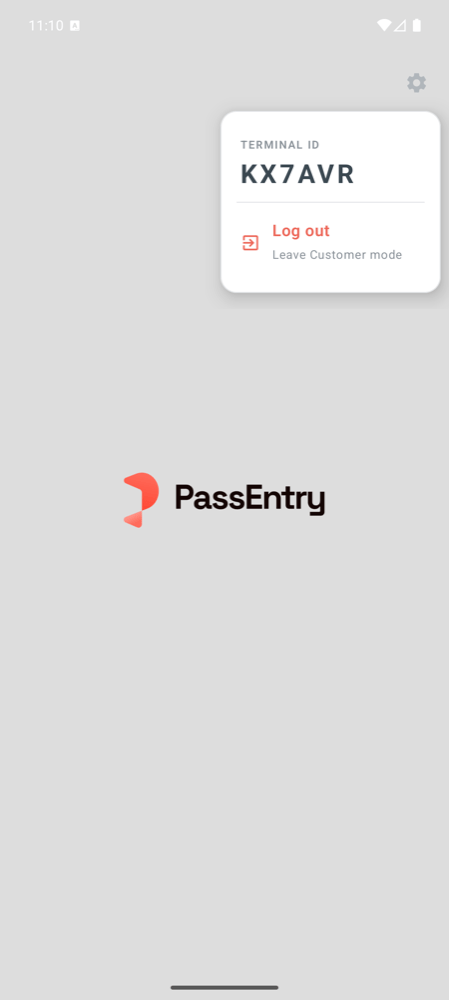
Open the app. On the login screen, tap **Mode: Standalone ▾** at the bottom and choose **Customer**. Do not log in. The app switches to a customer-facing idle screen showing the PassEntry logo, and remembers this choice across restarts and updates.
Tap the grey **gear** icon in the top-right corner of the idle screen. The menu shows **Terminal ID: XXXXXX**, for example `2NJE4Y`. It stays the same until the app is uninstalled, so write it on the device or store it against the till in your POS.
The terminal connects to `wss://pos.passentry.com/cable` as soon as it enters Customer mode, keeps that connection open and reconnects on its own after a network drop. It needs outbound access to `pos.passentry.com` on port 443, a stable Wi-Fi or Ethernet connection and mains power.
Type the Terminal ID exactly as shown, in uppercase. Pairing is case-sensitive. The ID never contains `0`, `O`, `1` or `I`.
To leave Customer mode, open the gear menu and choose **Log out**.
## 2. Log In as the Reader
Your POS authenticates the same way the PassEntry Reader app does: it signs in with the reader's ID and password, receives a short-lived token, and sends a heartbeat every 5 minutes to keep the session alive and rotate the token. The four calls are [Reader login](/api-reference/v1/readers/reader-login), [Reader heartbeat](/api-reference/v1/readers/reader-heartbeat), [Refresh reader token](/api-reference/v1/readers/refresh-reader-token) and [Reader logout](/api-reference/v1/readers/reader-logout).
### Sign in
The body must be wrapped in **`passentry_reader`**. Any other wrapper returns
`404 Invalid credentials`, exactly as if the Reader ID did not exist.
```bash theme={null}
curl -X POST https://api.passentry.com/api/v1/readers/login \
-H "Content-Type: application/json" \
-d '{ "passentry_reader": { "uuid": "till-04", "password": "{PASSWORD}" } }'
```
```json theme={null}
{
"data": {
"id": "till-04",
"type": "reader",
"attributes": {
"name": "Till 4",
"readerType": "PassentryReader",
"loggedIn": true,
"qrEnabled": true,
"mifareClassicNfcEnabled": false,
"ndefTagScanningEnabled": false,
"scanEnabled": true,
"redeemEnabled": true,
"addPointsEnabled": true,
"lastSeenAt": "2026-09-07T19:11:28Z",
"readerConfiguration": {
"nfcEnabled": true,
"nfcPrivateKey": "-----BEGIN EC PRIVATE KEY-----\n…\n-----END EC PRIVATE KEY-----",
"googleCollectorID": "95415519",
"applePassTypeID": "pass.com.example.loyalty",
"googleKeyVersion": 1
},
"validationConfiguration": { "validationType": "internal" },
"token": "eyJhbGciOiJIUzI1NiJ9…",
"refreshToken": "eyJhbGciOiJIUzI1NiJ9…"
}
}
}
```
Keep three things from the response:
* `token`: the bearer token for every API call and for the relay connection. It expires after **30 minutes**.
* `refreshToken`: lets you obtain a new token without the password. It expires after 6 weeks.
* `readerConfiguration`: the NFC credentials you will send to the terminal (see [Reading passes over NFC](#reading-passes-over-nfc)).
A wrong password returns `401` and an unknown Reader ID returns `404`, both with `{"errors": ["Invalid credentials"]}`. A body wrapped in the wrong key returns the same `404` as an unknown Reader ID, so if you get a `404` for a reader you know exists, check that your JSON is wrapped in `passentry_reader` before you look anywhere else.
### Send a heartbeat every 5 minutes
```bash theme={null}
curl https://api.passentry.com/api/v1/readers/till-04/heartbeat \
-H "Authorization: Bearer {TOKEN}"
```
```json theme={null}
{ "message": "Heartbeat successful", "token": "eyJ…", "refresh_token": "eyJ…" }
```
Each heartbeat marks the reader as online in the Dashboard and returns a **new** token and refresh token. Switch to the new token straight away: the previous one stops working the moment the heartbeat succeeds. Run the heartbeat on a 5 minute timer for as long as the POS is open, which keeps you well inside the 30 minute expiry.
### Recover from a 401
If an API call returns `401`, the token has expired or the reader was signed in elsewhere. Exchange the refresh token for a new pair, or sign in again with the password if the refresh token is also rejected:
```bash theme={null}
curl -X POST https://api.passentry.com/api/v1/readers/refresh_token \
-H "Content-Type: application/json" \
-d '{ "refresh_token": "{REFRESH_TOKEN}" }'
```
```json theme={null}
{ "message": "token refreshed", "token": "eyJ…", "refresh_token": "eyJ…" }
```
### Sign out
When the till closes, release the reader session:
```bash theme={null}
curl -X DELETE https://api.passentry.com/api/v1/readers/till-04/logout \
-H "Authorization: Bearer {TOKEN}"
```
## 3. Connect and Pair
The relay speaks the [Action Cable](https://guides.rubyonrails.org/action_cable_overview.html) protocol over a WebSocket. Every frame is JSON, and the `identifier` and `data` fields are themselves JSON encoded as strings.
### Open the socket
```
wss://pos.passentry.com/cable?poiid={READER_ID}&token={TOKEN}
```
Your Reader ID, for example `till-04`. It identifies this POS connection and is recorded as the owner of any terminal you pair with.
Your current reader token from login or the last heartbeat.
Send the sub-protocol header `Sec-WebSocket-Protocol: actioncable-v1-json`. The relay replies with `{"type":"welcome"}` once the socket is open. The socket stays valid while it is open; use whichever token is current when you reconnect.
Connect from your backend. The relay accepts connections with no `Origin` header (server-side WebSocket clients) or an `Origin` of `https://pos.passentry.com`. A browser page on any other origin is rejected with HTTP 404 during the handshake.
### Pair with the terminal
Subscribe to `RelayChannel` with the Terminal ID:
```json theme={null}
{
"command": "subscribe",
"identifier": "{\"channel\":\"RelayChannel\",\"terminal\":\"2NJE4Y\"}"
}
```
The relay answers with `{"type":"confirm_subscription", ...}` when the terminal is online and you now own it, or `{"type":"reject_subscription", ...}` when the Terminal ID is blank or the terminal is not connected. A rejection has no error body. If the terminal has just been switched on, wait a few seconds and retry.
Only one POS should drive a terminal at a time. If a second POS subscribes to the same Terminal ID, the relay hands ownership to the newest subscriber and the earlier one stops receiving the terminal's messages.
### Keep the pairing alive
Ownership expires after 60 seconds without activity. Call the `ping` action every 20 to 30 seconds while paired. This is separate from the 5 minute API heartbeat above: the API heartbeat keeps your reader session alive, the relay ping keeps your claim on the terminal alive.
The reply arrives wrapped in your subscription, like every other message from the relay, so read it from `message.type` rather than the top level:
```json theme={null}
{
"identifier": "{\"channel\":\"RelayChannel\",\"terminal\":\"2NJE4Y\"}",
"message": { "type": "pong" }
}
```
```json theme={null}
{
"command": "message",
"identifier": "{\"channel\":\"RelayChannel\",\"terminal\":\"2NJE4Y\"}",
"data": "{\"action\":\"ping\"}"
}
```
The relay also sends `{"type":"ping","message":}` frames every few seconds. Those need no reply.
### Send and receive
Send a message to the terminal with the `to_reader` action. Everything in `data` except `action` is forwarded unchanged:
```json theme={null}
{
"command": "message",
"identifier": "{\"channel\":\"RelayChannel\",\"terminal\":\"2NJE4Y\"}",
"data": "{\"action\":\"to_reader\",\"type\":\"start_capture\",\"flow\":\"SCAN\",\"mode\":\"QR\"}"
}
```
Messages from the terminal arrive wrapped in your subscription identifier. Dispatch on `message.type` and ignore any type you do not recognise:
```json theme={null}
{
"identifier": "{\"channel\":\"RelayChannel\",\"terminal\":\"2NJE4Y\"}",
"message": { "type": "captured", "passData": "7882e98b-0eba-4625-9223-5221eb8dad7f" }
}
```
Closing the socket or sending an `unsubscribe` command releases the terminal. If the socket drops mid-transaction, reconnect, wait for `welcome`, re-subscribe, send `cancel` and start the capture again.
## 4. Run a Scan, Accrue or Redeem
All three flows follow the same four steps. Only the `flow` value and the API call you make differ.
```mermaid theme={null}
sequenceDiagram
autonumber
participant POS as Your POS
participant T as PassEntry terminal
participant API as PassEntry API
POS->>T: start_capture (flow, mode, amountMinor)
Note over T: Shows "Earn 50 points"
Customer taps or scans
T->>POS: captured (passData, mode)
Note over T: Shows "Processing"
waits up to 15 s
POS->>API: POST /api/v1/scans
API-->>POS: validationResponse
POS->>T: result (success, message)
Note over T: Shows the result for 3 s,
then returns to idle
```
```json theme={null}
{
"action": "to_reader",
"type": "start_capture",
"flow": "ACCRUE",
"mode": "QR",
"amountMinor": 50
}
```
With no `readerConfig`, the terminal opens the camera and scans a QR code. To read passes over NFC, include `readerConfig` with the credentials from your login response (see [Reading passes over NFC](#reading-passes-over-nfc)). NFC needs both: the credentials from you, and `nfcEnabled` on the reader itself. With both in place the terminal offers the camera and NFC at once for these flows, so send `readerConfig` whenever the reader supports NFC and let the customer choose.
For Accrue and Redeem, `amountMinor` is the number of points shown to the customer: "Earn 50 points" or "Redeem 50 points" above the scan screen, and again on the success screen. It is display only. The API call decides the real amount.
 The terminal sends one `captured` per `start_capture`:
```json theme={null}
{ "type": "captured", "passData": "7882e98b-0eba-4625-9223-5221eb8dad7f", "mode": "NFC" }
```
`passData` is the value read from the pass. Over NFC it is the pass's NFC value, which defaults to the pass UUID. Over QR it is the barcode content, which also defaults to the pass UUID. If your pass template uses a custom NFC value or barcode, map it to a pass in your own system first, or use [third-party validation](../validation-options/guide) with the [Log scan](/api-reference/v1/scans/log-scan) endpoint.
`mode` is how the terminal read the pass: `NFC` or `QR`. Older terminal builds omit it, so treat a missing `mode` as `QR`. Use it to set `scanType` in the next step.
This is the method the customer actually used, which may not be the one you asked for: when the reader's configuration allows both, the terminal offers the camera and NFC together.
Use `passData` as `passId` in a [Create scan](/api-reference/v1/scans/create-scan) request, authenticated with your current reader token. `readerId` is your Reader ID. Set `scanType` from the capture `mode`: `nfc` when it was `NFC`, otherwise `barcode`.
`passId` accepts either the pass UUID or the pass's external ID, so if your passes were issued with your own customer number as the external ID you can pass that directly. The response carries both identifiers as `scanInfo.passId` and `scanInfo.passExtId`, which is the easiest way to link the scan back to a customer record in your POS.
One call covers all three. A positive `balance` accrues, a negative one redeems, and no
`loyalty` object at all is a plain Scan (which adds a stamp to a stamp-card pass). `message` is
the wallet notification the customer receives.
Send whole numbers. This integration deals in whole points. A template can be configured for
decimal balances instead, in which case the balance comes back as a float; if that is your
setup, read [Loyalty](/api-reference/v1/loyalty/guide) first.
```bash theme={null}
curl -X POST https://api.passentry.com/api/v1/scans \
-H "Authorization: Bearer {TOKEN}" \
-H "Content-Type: application/json" \
-d '{
"scan": {
"readerId": "till-04",
"passId": "7882e98b-0eba-4625-9223-5221eb8dad7f",
"scanType": "barcode",
"loyalty": { "balance": 50, "message": "You earned 50 points." }
}
}'
```
The response always has the same shape: a `validationResponse` with the outcome and the message
to show, and a `scanInfo` record of the scan. `loyalty` is present only when points changed, and
`passExtId` is null unless the pass was issued with an external ID.
```json theme={null}
{
"validationResponse": {
"status": "successful",
"statusDetail": null,
"readerInstructions": { "message": "50 points added to your balance. Current balance: 275" },
"loyalty": { "balanceChange": "50", "updatedBalance": "275", "operation": "add" }
},
"scanInfo": {
"scanId": "019488b8-c2fc-7b5b-b5b4-deb2b7f33bdd",
"scanType": "barcode",
"scanValue": "7882e98b-0eba-4625-9223-5221eb8dad7f",
"validationType": "internalValidation",
"status": "successful",
"statusDetail": null,
"scannedAt": "2026-09-15T11:56:37Z",
"passId": "7882e98b-0eba-4625-9223-5221eb8dad7f",
"passExtId": "CUST-000123",
"readerId": "till-04"
}
}
```
A redeem reads "You successfully redeemed 50 points. Current balance: 225" with `operation`
`redeem`; a plain Scan reads "Scan was validated successfully" with no `loyalty` object, or
"Your card was stamped successfully" with `operation` `stamp` on a stamp card.
A pass that fails validation still returns **200**, with `status: "failed"` and the reason in `statusDetail` and `readerInstructions.message`. The scan is recorded and no points change:
```json theme={null}
{
"validationResponse": {
"status": "failed",
"statusDetail": "Pass is not active",
"readerInstructions": { "message": "Pass is not active" }
},
"scanInfo": { "scanId": "…", "status": "failed", "statusDetail": "Pass is not active", "passId": "…", "passExtId": "…", "readerId": "till-04" }
}
```
The two validation failures are `Pass is not active` (the pass is expired, deactivated or nullified) and `Pass already used within validity period` (a repeat scan inside the validity window set on your reader configuration).
**Repeat posts are not deduplicated.** There is no idempotency key on `POST /api/v1/scans`, and
a reader session cannot look a scan up afterwards, so a retry after a timeout will move the
balance twice. If a call times out you do not know whether it landed: read the balance back with
[Get loyalty balance](/api-reference/v1/loyalty/show-loyalty-balance) before retrying, and guard
the button against a double press at the till.
Requests that cannot be processed at all return an error status with an `errors` array.
Every response carries rate limit headers — `x-rate-limit-limit`, `x-rate-limit-remaining` and
`x-rate-limit-reset` (a Unix timestamp), scoped per endpoint by `x-rate-limit-url`. The
allowance is 10 per endpoint and refills continuously, so a till serving customers will not
approach it. A burst can: fired back to back from one process, reads exhaust it and the API
starts returning `429`. Watch `x-rate-limit-remaining` and back off on a `429` rather than
retrying immediately, particularly in anything that loops.
| Status | Body | When |
| - | - | - |
| `404` | `{"errors": ["Pass does not exist"]}` | `passId` matches no live pass in your entity. `GET /loyalty/{id}` words the same condition differently, `{"errors": ["Pass with provided id not found"]}`, so match on the status rather than the text |
| `404` | `{"errors": ["Reader does not exist"]}` | `readerId` is not the reader you logged in as |
| `422` | `{"errors": ["Insufficient balance for the requested deduction, current balance is 20"]}` | Redeem for more points than the pass holds |
| `422` | `{"errors": ["Balance must be a number"]}` | `loyalty.balance` is not numeric. Send a number, not a numeric string |
| `422` | `{"errors": ["Scan type can't be blank"]}` | `scanType` was omitted. It is required on every scan, including a plain Scan with no `loyalty` object |
| `422` | `{"errors": ["'magstripe' is not a valid scan_type"]}` | `scanType` must be exactly `nfc` or `barcode` |
| `412` | `{"errors": ["Loyalty is not enabled for this pass. Please enable it at the pass template level"]}` | Accrue or Redeem on a template without loyalty balance |
| `401` | `{"errors": ["Access denied. Please, sign in again."]}` | Reader token expired or rotated |
| `401` | `{"errors": ["Access denied"]}` | The `Authorization` header is missing or is not a token at all. Match on the status, not the wording: the text differs between a spent token and an unreadable one |
| `403` | `{"errors": ["Reader is not authorized to perform this action."]}` | The reader is not enabled for this operation, or the endpoint is not available to a reader session at all |
Send `result` within **15 seconds** of receiving `captured`. The terminal shows the outcome for 3 seconds and returns to idle.
```json theme={null}
{ "action": "to_reader", "type": "result", "success": true }
```
```json theme={null}
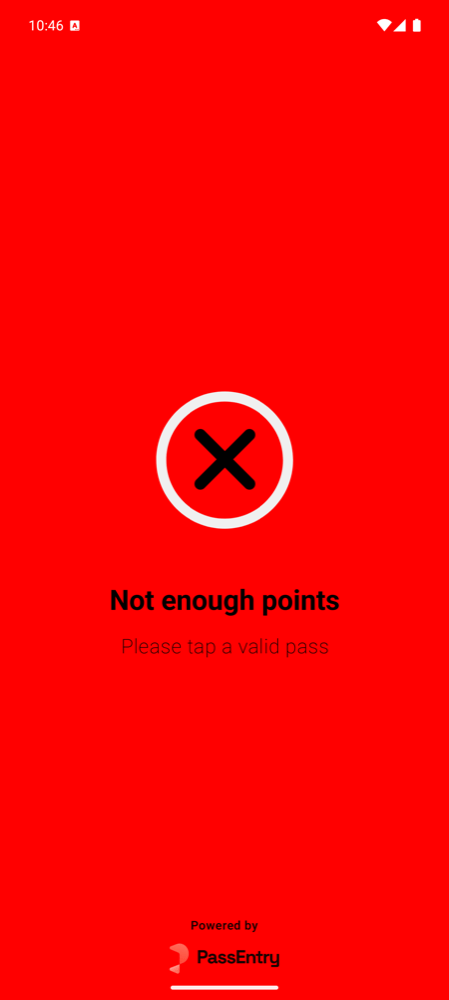
{ "action": "to_reader", "type": "result", "success": false, "message": "Not enough points" }
```
On success the terminal shows the flow's success screen with your `message` as the heading, or a default of "Pass Valid", "Points Added" or "Points Redeemed" when you omit it. Accrue and Redeem also show the points amount from `start_capture`. On failure it shows an "invalid pass" screen with your `message`.
Pass `validationResponse.readerInstructions.message` from the API response straight through as `message`. The customer then sees the same wording as your POS, for example "50 points added to your balance. Current balance: 275".
If no `result` arrives within 15 seconds, the terminal returns to idle without telling the customer whether anything happened. If the API call is slow or errors, send a failure result at your own deadline and reconcile afterwards.
### Cancel a capture
```json theme={null}
{ "action": "to_reader", "type": "cancel" }
```
Send `cancel` when staff back out of the transaction, and **when your own timeout expires**. The terminal's scan screen has no timeout of its own, so if your POS stops waiting after 60 seconds and does not say so, the terminal stays armed and a later tap goes nowhere. Sending a new `start_capture` while one is in progress replaces it.
A timeout tells you nothing about why. The customer may not have presented anything, another POS may have taken the terminal, or your `start_capture` may never have arrived, since `to_reader` is not acknowledged. All three look identical: no frame, no error, no socket close. Treat a timeout as "unknown", ask the cashier to try again, and do not report to them that the customer walked away.
## 5. The API Calls Behind the Integration
The reader token from step 2 authenticates every call. Create scan is covered in step 4; the two
balance calls and end-of-day reconciliation are below.
### Check a balance before redeeming
Use the `passData` from `captured` as the pass ID. The balance is returned in `meta.loyalty.balance`, as an integer or a decimal depending on the pass template.
```bash theme={null}
curl https://api.passentry.com/api/v1/loyalty/7882e98b-0eba-4625-9223-5221eb8dad7f \
-H "Authorization: Bearer {TOKEN}"
```
```json theme={null}
{
"data": { "id": "7882e98b-0eba-4625-9223-5221eb8dad7f", "type": "pass", "attributes": { "status": "active", "extId": "CUST-000123", "passTemplateName": "PassEntry Coffee" } },
"meta": { "loyalty": { "balance": 225 } }
}
```
A typical redeem flow is: capture the pass, read the balance, decide the discount, then send the Create scan request with the negative `balance` and finish with `result`. Keep all three inside the 15 second window, or send `result` as soon as the scan call returns and read the balance beforehand.
### Adjust a balance without a tap
Update loyalty balance changes a pass's balance directly and sends the customer a wallet notification. Use it when there is no customer at the terminal, for example refunding points after a returned item or correcting a mistake. It does not record a scan or apply the reader's validity period, so keep Create scan for anything that happens at the till.
```bash theme={null}
curl -X PATCH https://api.passentry.com/api/v1/loyalty/7882e98b-0eba-4625-9223-5221eb8dad7f \
-H "Authorization: Bearer {TOKEN}" \
-H "Content-Type: application/json" \
-d '{ "balance": -20, "message": "20 points removed for your refunded order." }'
```
`balance` adds when positive and subtracts when negative. Send `overrideBalance` instead to set an absolute value. The response has the same shape as Get loyalty balance, with the new balance in `meta.loyalty.balance`. A non-numeric balance returns `400` with `{"errors": ["Balance must be a number"]}`.
### Reconciliation and reporting
Scan history is not available to a reader session. [List scans](/api-reference/v1/scans/get-scans) and [Get scan](/api-reference/v1/scans/get-scan) return `403 Reader is not authorized to perform this action` for a reader token. For end-of-day reconciliation, call them from your backend with an organisation [API key](https://app.passentry.com/developer-tools) and filter by `readerId`, `passId` or `createdAfter`. Every scan your POS created in step 4 appears there with its `scanId`, so store that ID against your transaction when the Create scan response arrives.
## Reading Passes Over NFC
Reading a wallet pass over NFC requires credentials that identify your entity to Apple Wallet and Google Wallet and decrypt the value the pass returns. Because a terminal in Customer mode has no account of its own, your POS sends these credentials with each `start_capture`.
They are already in the `readerConfiguration` object of your login response. Map them into `readerConfig` like this:
| Login response | `readerConfig` field |
| - | - |
| `nfcPrivateKey` | `privateKey` |
| `googleCollectorID` | `googleCollectorId` |
| `applePassTypeID` | `applePassTypeId` |
| `googleKeyVersion` | `googleKeyVersion` |
| `nfcEnabled` | `nfcEnabled` |
```json theme={null}
{
"action": "to_reader",
"type": "start_capture",
"flow": "REDEEM",
"mode": "NFC",
"amountMinor": 50,
"readerConfig": {
"nfcEnabled": true,
"qrEnabled": true,
"privateKey": "-----BEGIN EC PRIVATE KEY-----\n…\n-----END EC PRIVATE KEY-----",
"googleCollectorId": "95415519",
"applePassTypeId": "pass.com.example.loyalty",
"googleKeyVersion": 1
}
}
```
With both `nfcEnabled` and `qrEnabled` set, the terminal shows a toggle between NFC and camera, starting on the method named in `mode`. A device without NFC hardware uses the camera when `qrEnabled` is `true`.
If you include `readerConfig` at all, it must contain `privateKey`, `googleCollectorId` and `applePassTypeId`. A `readerConfig` missing any of them makes the whole `start_capture` unreadable and the terminal ignores it. For QR only, leave `readerConfig` out.
The private key lets a device decrypt your customers' pass values. Only send it over the TLS WebSocket, only to terminals you operate, and never log it.
## Message Reference
Messages are JSON objects with a `type` field. Unknown fields are ignored on both sides.
### POS to terminal
Arms the terminal to read one pass.
`SCAN`, `ACCRUE` or `REDEEM`. Controls the banner during capture and the wording of the success screen.
`NFC` or `QR`. Which capture method to show first. Cannot enable a method that `readerConfig` has disabled.
For `ACCRUE` and `REDEEM`, the number of points to display during the capture and on the success screen. Omit for `SCAN`.
Omit for QR only. When present, `privateKey`, `googleCollectorId` and `applePassTypeId` are required; `googleKeyVersion` defaults to `1`, `nfcEnabled` to `false` and `qrEnabled` to `true`.
The outcome to show the customer. Must arrive within 15 seconds of `captured`.
`true` shows the flow's success screen, `false` the invalid-pass screen.
Heading shown on the success or failure screen. Omit on success to get the default heading for the flow. Keep it short, or pass the API's `readerInstructions.message` through unchanged.
Aborts the current capture and returns the terminal to idle. Ignored when the terminal is already idle.
### Terminal to POS
The customer presented a pass. Sent once per `start_capture`.
The value read from the pass. By default the pass UUID.
`NFC` or `QR`, how the terminal read the pass. Absent on older terminal builds, which you should treat as `QR`. Map `NFC` to `scanType: "nfc"` and anything else to `scanType: "barcode"`.
Other types may appear in future. Ignore any you do not recognise.
## Example
A minimal Node.js client that logs in, heartbeats, pairs, asks for a QR scan and adds 10 points. It needs Node 18 or later and the `ws` package.
```javascript theme={null}
import WebSocket from "ws";
const API = "https://api.passentry.com/api/v1";
const RELAY = "wss://pos.passentry.com/cable";
const READER_ID = process.env.READER_ID; // e.g. till-04
const PASSWORD = process.env.READER_PASSWORD;
const TERMINAL = process.env.TERMINAL_ID; // shown in the terminal's gear menu, e.g. 2NJE4Y
const POINTS = 10;
// Sign in as the reader. The token expires after 30 minutes; the heartbeat below rotates it.
const login = await fetch(`${API}/readers/login`, {
method: "POST",
headers: { "Content-Type": "application/json" },
body: JSON.stringify({ passentry_reader: { uuid: READER_ID, password: PASSWORD } }),
}).then((r) => r.json());
let token = login.data.attributes.token;
// What this reader is configured to do. The API will not refuse a disabled mode, so this is the
// only thing stopping a cashier from running an operation the reader was not set up for.
const { scanEnabled, addPointsEnabled, redeemEnabled } = login.data.attributes;
const allowed = { SCAN: scanEnabled, ACCRUE: addPointsEnabled, REDEEM: redeemEnabled };
function assertAllowed(flow) {
if (!allowed[flow]) throw new Error(`This reader is not set up for ${flow}`);
}
// Heartbeat every 5 minutes, exactly like the PassEntry Reader app. Each reply carries a new token.
setInterval(async () => {
const hb = await fetch(`${API}/readers/${READER_ID}/heartbeat`, {
headers: { Authorization: `Bearer ${token}` },
}).then((r) => r.json());
if (hb.token) token = hb.token;
}, 5 * 60 * 1000);
const identifier = JSON.stringify({ channel: "RelayChannel", terminal: TERMINAL });
const ws = new WebSocket(`${RELAY}?poiid=${READER_ID}&token=${token}`, "actioncable-v1-json");
const send = (command, data) =>
ws.send(JSON.stringify({ command, identifier, ...(data && { data: JSON.stringify(data) }) }));
const toReader = (message) => send("message", { action: "to_reader", ...message });
ws.on("message", async (raw) => {
const frame = JSON.parse(raw);
if (frame.type === "welcome") return send("subscribe");
if (frame.type === "reject_subscription") return ws.close(1000, "terminal offline");
if (frame.type === "confirm_subscription") {
setInterval(() => send("message", { action: "ping" }), 25_000);
assertAllowed("ACCRUE"); // check before you arm the terminal, not after the customer has tapped
return toReader({ type: "start_capture", flow: "ACCRUE", mode: "QR", amountMinor: POINTS });
}
if (frame.message?.type !== "captured") return;
const res = await fetch(`${API}/scans`, {
method: "POST",
headers: { Authorization: `Bearer ${token}`, "Content-Type": "application/json" },
body: JSON.stringify({
scan: {
readerId: READER_ID,
passId: frame.message.passData,
scanType: frame.message.mode === "NFC" ? "nfc" : "barcode",
loyalty: { balance: POINTS, message: `You earned ${POINTS} points.` },
},
}),
});
const body = await res.json();
const ok = res.ok && body.validationResponse?.status === "successful";
toReader({
type: "result",
success: ok,
message: ok ? body.validationResponse.readerInstructions?.message : body.errors?.[0] ?? "Could not add points",
});
console.log(ok ? `balance is now ${body.validationResponse.loyalty.updatedBalance}` : body);
setTimeout(() => ws.close(), 500);
});
```
What you should see:
1. The reader shows as logged in on the [Readers](https://app.passentry.com/readers) page.
2. The terminal leaves the logo screen and shows **"Earn 10 points"** above a camera view.
3. Hold the pass's QR code up to the camera. The terminal shows **Processing**.
4. The script prints `balance is now …`.
5. The terminal shows **Added Points 10** with the API's message, "10 points added to your balance. Current balance: …", for three seconds, then returns to the logo.
6. The customer's phone receives a wallet notification: "You earned 10 points."
## Troubleshooting
The Reader ID or password is wrong, or the reader is a VTAP reader rather than a PassEntry Reader. Check the [Readers](https://app.passentry.com/readers) page.
The token expired (30 minutes without a heartbeat), you kept using the old token after a heartbeat rotated it, or the same reader was signed in somewhere else. Use the token from the latest heartbeat, exchange the refresh token, or sign in again. Give each POS its own reader.
You connected from a browser page on another origin. Connect from your backend.
Wrong or lowercase Terminal ID, or the terminal is offline. Check the gear menu, confirm the device shows the idle logo screen, wait 10 seconds and retry.
One of three things: another POS paired with the same Terminal ID since, `readerConfig` is missing a credential field, or `flow` or `mode` is not one of the uppercase values above.
The 15 second window passed. Reply faster, or send a failure result at your own deadline.
Your POS stopped waiting without sending `cancel`.
`readerId` must be the Reader ID you logged in with. A reader token cannot record scans against another reader.
`passId` must be a pass UUID or external ID. Custom NFC or barcode values need mapping first.
Not enough points on the pass. Send a failure result with a clear message.
Loyalty balance is not enabled on the pass template.
If you are still stuck, email [support@passentry.com](mailto:support@passentry.com) with the Reader ID, the Terminal ID, the time of the transaction and the frames your POS sent and received.
## Related topics
- [PassEntry Reader App Configuration Guide](/documentation/guides/passentry-reader-app/guide.md)
- [Loyalty](/api-reference/v1/loyalty/guide.md)
This documentation is built and hosted on [Mintlify](https://mintlify.com), a developer documentation platform.
The terminal sends one `captured` per `start_capture`:
```json theme={null}
{ "type": "captured", "passData": "7882e98b-0eba-4625-9223-5221eb8dad7f", "mode": "NFC" }
```
`passData` is the value read from the pass. Over NFC it is the pass's NFC value, which defaults to the pass UUID. Over QR it is the barcode content, which also defaults to the pass UUID. If your pass template uses a custom NFC value or barcode, map it to a pass in your own system first, or use [third-party validation](../validation-options/guide) with the [Log scan](/api-reference/v1/scans/log-scan) endpoint.
`mode` is how the terminal read the pass: `NFC` or `QR`. Older terminal builds omit it, so treat a missing `mode` as `QR`. Use it to set `scanType` in the next step.
This is the method the customer actually used, which may not be the one you asked for: when the reader's configuration allows both, the terminal offers the camera and NFC together.
Use `passData` as `passId` in a [Create scan](/api-reference/v1/scans/create-scan) request, authenticated with your current reader token. `readerId` is your Reader ID. Set `scanType` from the capture `mode`: `nfc` when it was `NFC`, otherwise `barcode`.
`passId` accepts either the pass UUID or the pass's external ID, so if your passes were issued with your own customer number as the external ID you can pass that directly. The response carries both identifiers as `scanInfo.passId` and `scanInfo.passExtId`, which is the easiest way to link the scan back to a customer record in your POS.
One call covers all three. A positive `balance` accrues, a negative one redeems, and no
`loyalty` object at all is a plain Scan (which adds a stamp to a stamp-card pass). `message` is
the wallet notification the customer receives.
Send whole numbers. This integration deals in whole points. A template can be configured for
decimal balances instead, in which case the balance comes back as a float; if that is your
setup, read [Loyalty](/api-reference/v1/loyalty/guide) first.
```bash theme={null}
curl -X POST https://api.passentry.com/api/v1/scans \
-H "Authorization: Bearer {TOKEN}" \
-H "Content-Type: application/json" \
-d '{
"scan": {
"readerId": "till-04",
"passId": "7882e98b-0eba-4625-9223-5221eb8dad7f",
"scanType": "barcode",
"loyalty": { "balance": 50, "message": "You earned 50 points." }
}
}'
```
The response always has the same shape: a `validationResponse` with the outcome and the message
to show, and a `scanInfo` record of the scan. `loyalty` is present only when points changed, and
`passExtId` is null unless the pass was issued with an external ID.
```json theme={null}
{
"validationResponse": {
"status": "successful",
"statusDetail": null,
"readerInstructions": { "message": "50 points added to your balance. Current balance: 275" },
"loyalty": { "balanceChange": "50", "updatedBalance": "275", "operation": "add" }
},
"scanInfo": {
"scanId": "019488b8-c2fc-7b5b-b5b4-deb2b7f33bdd",
"scanType": "barcode",
"scanValue": "7882e98b-0eba-4625-9223-5221eb8dad7f",
"validationType": "internalValidation",
"status": "successful",
"statusDetail": null,
"scannedAt": "2026-09-15T11:56:37Z",
"passId": "7882e98b-0eba-4625-9223-5221eb8dad7f",
"passExtId": "CUST-000123",
"readerId": "till-04"
}
}
```
A redeem reads "You successfully redeemed 50 points. Current balance: 225" with `operation`
`redeem`; a plain Scan reads "Scan was validated successfully" with no `loyalty` object, or
"Your card was stamped successfully" with `operation` `stamp` on a stamp card.
A pass that fails validation still returns **200**, with `status: "failed"` and the reason in `statusDetail` and `readerInstructions.message`. The scan is recorded and no points change:
```json theme={null}
{
"validationResponse": {
"status": "failed",
"statusDetail": "Pass is not active",
"readerInstructions": { "message": "Pass is not active" }
},
"scanInfo": { "scanId": "…", "status": "failed", "statusDetail": "Pass is not active", "passId": "…", "passExtId": "…", "readerId": "till-04" }
}
```
The two validation failures are `Pass is not active` (the pass is expired, deactivated or nullified) and `Pass already used within validity period` (a repeat scan inside the validity window set on your reader configuration).
**Repeat posts are not deduplicated.** There is no idempotency key on `POST /api/v1/scans`, and
a reader session cannot look a scan up afterwards, so a retry after a timeout will move the
balance twice. If a call times out you do not know whether it landed: read the balance back with
[Get loyalty balance](/api-reference/v1/loyalty/show-loyalty-balance) before retrying, and guard
the button against a double press at the till.
Requests that cannot be processed at all return an error status with an `errors` array.
Every response carries rate limit headers — `x-rate-limit-limit`, `x-rate-limit-remaining` and
`x-rate-limit-reset` (a Unix timestamp), scoped per endpoint by `x-rate-limit-url`. The
allowance is 10 per endpoint and refills continuously, so a till serving customers will not
approach it. A burst can: fired back to back from one process, reads exhaust it and the API
starts returning `429`. Watch `x-rate-limit-remaining` and back off on a `429` rather than
retrying immediately, particularly in anything that loops.
| Status | Body | When |
| - | - | - |
| `404` | `{"errors": ["Pass does not exist"]}` | `passId` matches no live pass in your entity. `GET /loyalty/{id}` words the same condition differently, `{"errors": ["Pass with provided id not found"]}`, so match on the status rather than the text |
| `404` | `{"errors": ["Reader does not exist"]}` | `readerId` is not the reader you logged in as |
| `422` | `{"errors": ["Insufficient balance for the requested deduction, current balance is 20"]}` | Redeem for more points than the pass holds |
| `422` | `{"errors": ["Balance must be a number"]}` | `loyalty.balance` is not numeric. Send a number, not a numeric string |
| `422` | `{"errors": ["Scan type can't be blank"]}` | `scanType` was omitted. It is required on every scan, including a plain Scan with no `loyalty` object |
| `422` | `{"errors": ["'magstripe' is not a valid scan_type"]}` | `scanType` must be exactly `nfc` or `barcode` |
| `412` | `{"errors": ["Loyalty is not enabled for this pass. Please enable it at the pass template level"]}` | Accrue or Redeem on a template without loyalty balance |
| `401` | `{"errors": ["Access denied. Please, sign in again."]}` | Reader token expired or rotated |
| `401` | `{"errors": ["Access denied"]}` | The `Authorization` header is missing or is not a token at all. Match on the status, not the wording: the text differs between a spent token and an unreadable one |
| `403` | `{"errors": ["Reader is not authorized to perform this action."]}` | The reader is not enabled for this operation, or the endpoint is not available to a reader session at all |
Send `result` within **15 seconds** of receiving `captured`. The terminal shows the outcome for 3 seconds and returns to idle.
```json theme={null}
{ "action": "to_reader", "type": "result", "success": true }
```
```json theme={null}
{ "action": "to_reader", "type": "result", "success": false, "message": "Not enough points" }
```
On success the terminal shows the flow's success screen with your `message` as the heading, or a default of "Pass Valid", "Points Added" or "Points Redeemed" when you omit it. Accrue and Redeem also show the points amount from `start_capture`. On failure it shows an "invalid pass" screen with your `message`.
Pass `validationResponse.readerInstructions.message` from the API response straight through as `message`. The customer then sees the same wording as your POS, for example "50 points added to your balance. Current balance: 275".
If no `result` arrives within 15 seconds, the terminal returns to idle without telling the customer whether anything happened. If the API call is slow or errors, send a failure result at your own deadline and reconcile afterwards.
### Cancel a capture
```json theme={null}
{ "action": "to_reader", "type": "cancel" }
```
Send `cancel` when staff back out of the transaction, and **when your own timeout expires**. The terminal's scan screen has no timeout of its own, so if your POS stops waiting after 60 seconds and does not say so, the terminal stays armed and a later tap goes nowhere. Sending a new `start_capture` while one is in progress replaces it.
A timeout tells you nothing about why. The customer may not have presented anything, another POS may have taken the terminal, or your `start_capture` may never have arrived, since `to_reader` is not acknowledged. All three look identical: no frame, no error, no socket close. Treat a timeout as "unknown", ask the cashier to try again, and do not report to them that the customer walked away.
## 5. The API Calls Behind the Integration
The reader token from step 2 authenticates every call. Create scan is covered in step 4; the two
balance calls and end-of-day reconciliation are below.
### Check a balance before redeeming
Use the `passData` from `captured` as the pass ID. The balance is returned in `meta.loyalty.balance`, as an integer or a decimal depending on the pass template.
```bash theme={null}
curl https://api.passentry.com/api/v1/loyalty/7882e98b-0eba-4625-9223-5221eb8dad7f \
-H "Authorization: Bearer {TOKEN}"
```
```json theme={null}
{
"data": { "id": "7882e98b-0eba-4625-9223-5221eb8dad7f", "type": "pass", "attributes": { "status": "active", "extId": "CUST-000123", "passTemplateName": "PassEntry Coffee" } },
"meta": { "loyalty": { "balance": 225 } }
}
```
A typical redeem flow is: capture the pass, read the balance, decide the discount, then send the Create scan request with the negative `balance` and finish with `result`. Keep all three inside the 15 second window, or send `result` as soon as the scan call returns and read the balance beforehand.
### Adjust a balance without a tap
Update loyalty balance changes a pass's balance directly and sends the customer a wallet notification. Use it when there is no customer at the terminal, for example refunding points after a returned item or correcting a mistake. It does not record a scan or apply the reader's validity period, so keep Create scan for anything that happens at the till.
```bash theme={null}
curl -X PATCH https://api.passentry.com/api/v1/loyalty/7882e98b-0eba-4625-9223-5221eb8dad7f \
-H "Authorization: Bearer {TOKEN}" \
-H "Content-Type: application/json" \
-d '{ "balance": -20, "message": "20 points removed for your refunded order." }'
```
`balance` adds when positive and subtracts when negative. Send `overrideBalance` instead to set an absolute value. The response has the same shape as Get loyalty balance, with the new balance in `meta.loyalty.balance`. A non-numeric balance returns `400` with `{"errors": ["Balance must be a number"]}`.
### Reconciliation and reporting
Scan history is not available to a reader session. [List scans](/api-reference/v1/scans/get-scans) and [Get scan](/api-reference/v1/scans/get-scan) return `403 Reader is not authorized to perform this action` for a reader token. For end-of-day reconciliation, call them from your backend with an organisation [API key](https://app.passentry.com/developer-tools) and filter by `readerId`, `passId` or `createdAfter`. Every scan your POS created in step 4 appears there with its `scanId`, so store that ID against your transaction when the Create scan response arrives.
## Reading Passes Over NFC
Reading a wallet pass over NFC requires credentials that identify your entity to Apple Wallet and Google Wallet and decrypt the value the pass returns. Because a terminal in Customer mode has no account of its own, your POS sends these credentials with each `start_capture`.
They are already in the `readerConfiguration` object of your login response. Map them into `readerConfig` like this:
| Login response | `readerConfig` field |
| - | - |
| `nfcPrivateKey` | `privateKey` |
| `googleCollectorID` | `googleCollectorId` |
| `applePassTypeID` | `applePassTypeId` |
| `googleKeyVersion` | `googleKeyVersion` |
| `nfcEnabled` | `nfcEnabled` |
```json theme={null}
{
"action": "to_reader",
"type": "start_capture",
"flow": "REDEEM",
"mode": "NFC",
"amountMinor": 50,
"readerConfig": {
"nfcEnabled": true,
"qrEnabled": true,
"privateKey": "-----BEGIN EC PRIVATE KEY-----\n…\n-----END EC PRIVATE KEY-----",
"googleCollectorId": "95415519",
"applePassTypeId": "pass.com.example.loyalty",
"googleKeyVersion": 1
}
}
```
With both `nfcEnabled` and `qrEnabled` set, the terminal shows a toggle between NFC and camera, starting on the method named in `mode`. A device without NFC hardware uses the camera when `qrEnabled` is `true`.
If you include `readerConfig` at all, it must contain `privateKey`, `googleCollectorId` and `applePassTypeId`. A `readerConfig` missing any of them makes the whole `start_capture` unreadable and the terminal ignores it. For QR only, leave `readerConfig` out.
The private key lets a device decrypt your customers' pass values. Only send it over the TLS WebSocket, only to terminals you operate, and never log it.
## Message Reference
Messages are JSON objects with a `type` field. Unknown fields are ignored on both sides.
### POS to terminal
Arms the terminal to read one pass.
`SCAN`, `ACCRUE` or `REDEEM`. Controls the banner during capture and the wording of the success screen.
`NFC` or `QR`. Which capture method to show first. Cannot enable a method that `readerConfig` has disabled.
For `ACCRUE` and `REDEEM`, the number of points to display during the capture and on the success screen. Omit for `SCAN`.
Omit for QR only. When present, `privateKey`, `googleCollectorId` and `applePassTypeId` are required; `googleKeyVersion` defaults to `1`, `nfcEnabled` to `false` and `qrEnabled` to `true`.
The outcome to show the customer. Must arrive within 15 seconds of `captured`.
`true` shows the flow's success screen, `false` the invalid-pass screen.
Heading shown on the success or failure screen. Omit on success to get the default heading for the flow. Keep it short, or pass the API's `readerInstructions.message` through unchanged.
Aborts the current capture and returns the terminal to idle. Ignored when the terminal is already idle.
### Terminal to POS
The customer presented a pass. Sent once per `start_capture`.
The value read from the pass. By default the pass UUID.
`NFC` or `QR`, how the terminal read the pass. Absent on older terminal builds, which you should treat as `QR`. Map `NFC` to `scanType: "nfc"` and anything else to `scanType: "barcode"`.
Other types may appear in future. Ignore any you do not recognise.
## Example
A minimal Node.js client that logs in, heartbeats, pairs, asks for a QR scan and adds 10 points. It needs Node 18 or later and the `ws` package.
```javascript theme={null}
import WebSocket from "ws";
const API = "https://api.passentry.com/api/v1";
const RELAY = "wss://pos.passentry.com/cable";
const READER_ID = process.env.READER_ID; // e.g. till-04
const PASSWORD = process.env.READER_PASSWORD;
const TERMINAL = process.env.TERMINAL_ID; // shown in the terminal's gear menu, e.g. 2NJE4Y
const POINTS = 10;
// Sign in as the reader. The token expires after 30 minutes; the heartbeat below rotates it.
const login = await fetch(`${API}/readers/login`, {
method: "POST",
headers: { "Content-Type": "application/json" },
body: JSON.stringify({ passentry_reader: { uuid: READER_ID, password: PASSWORD } }),
}).then((r) => r.json());
let token = login.data.attributes.token;
// What this reader is configured to do. The API will not refuse a disabled mode, so this is the
// only thing stopping a cashier from running an operation the reader was not set up for.
const { scanEnabled, addPointsEnabled, redeemEnabled } = login.data.attributes;
const allowed = { SCAN: scanEnabled, ACCRUE: addPointsEnabled, REDEEM: redeemEnabled };
function assertAllowed(flow) {
if (!allowed[flow]) throw new Error(`This reader is not set up for ${flow}`);
}
// Heartbeat every 5 minutes, exactly like the PassEntry Reader app. Each reply carries a new token.
setInterval(async () => {
const hb = await fetch(`${API}/readers/${READER_ID}/heartbeat`, {
headers: { Authorization: `Bearer ${token}` },
}).then((r) => r.json());
if (hb.token) token = hb.token;
}, 5 * 60 * 1000);
const identifier = JSON.stringify({ channel: "RelayChannel", terminal: TERMINAL });
const ws = new WebSocket(`${RELAY}?poiid=${READER_ID}&token=${token}`, "actioncable-v1-json");
const send = (command, data) =>
ws.send(JSON.stringify({ command, identifier, ...(data && { data: JSON.stringify(data) }) }));
const toReader = (message) => send("message", { action: "to_reader", ...message });
ws.on("message", async (raw) => {
const frame = JSON.parse(raw);
if (frame.type === "welcome") return send("subscribe");
if (frame.type === "reject_subscription") return ws.close(1000, "terminal offline");
if (frame.type === "confirm_subscription") {
setInterval(() => send("message", { action: "ping" }), 25_000);
assertAllowed("ACCRUE"); // check before you arm the terminal, not after the customer has tapped
return toReader({ type: "start_capture", flow: "ACCRUE", mode: "QR", amountMinor: POINTS });
}
if (frame.message?.type !== "captured") return;
const res = await fetch(`${API}/scans`, {
method: "POST",
headers: { Authorization: `Bearer ${token}`, "Content-Type": "application/json" },
body: JSON.stringify({
scan: {
readerId: READER_ID,
passId: frame.message.passData,
scanType: frame.message.mode === "NFC" ? "nfc" : "barcode",
loyalty: { balance: POINTS, message: `You earned ${POINTS} points.` },
},
}),
});
const body = await res.json();
const ok = res.ok && body.validationResponse?.status === "successful";
toReader({
type: "result",
success: ok,
message: ok ? body.validationResponse.readerInstructions?.message : body.errors?.[0] ?? "Could not add points",
});
console.log(ok ? `balance is now ${body.validationResponse.loyalty.updatedBalance}` : body);
setTimeout(() => ws.close(), 500);
});
```
What you should see:
1. The reader shows as logged in on the [Readers](https://app.passentry.com/readers) page.
2. The terminal leaves the logo screen and shows **"Earn 10 points"** above a camera view.
3. Hold the pass's QR code up to the camera. The terminal shows **Processing**.
4. The script prints `balance is now …`.
5. The terminal shows **Added Points 10** with the API's message, "10 points added to your balance. Current balance: …", for three seconds, then returns to the logo.
6. The customer's phone receives a wallet notification: "You earned 10 points."
## Troubleshooting
The Reader ID or password is wrong, or the reader is a VTAP reader rather than a PassEntry Reader. Check the [Readers](https://app.passentry.com/readers) page.
The token expired (30 minutes without a heartbeat), you kept using the old token after a heartbeat rotated it, or the same reader was signed in somewhere else. Use the token from the latest heartbeat, exchange the refresh token, or sign in again. Give each POS its own reader.
You connected from a browser page on another origin. Connect from your backend.
Wrong or lowercase Terminal ID, or the terminal is offline. Check the gear menu, confirm the device shows the idle logo screen, wait 10 seconds and retry.
One of three things: another POS paired with the same Terminal ID since, `readerConfig` is missing a credential field, or `flow` or `mode` is not one of the uppercase values above.
The 15 second window passed. Reply faster, or send a failure result at your own deadline.
Your POS stopped waiting without sending `cancel`.
`readerId` must be the Reader ID you logged in with. A reader token cannot record scans against another reader.
`passId` must be a pass UUID or external ID. Custom NFC or barcode values need mapping first.
Not enough points on the pass. Send a failure result with a clear message.
Loyalty balance is not enabled on the pass template.
If you are still stuck, email [support@passentry.com](mailto:support@passentry.com) with the Reader ID, the Terminal ID, the time of the transaction and the frames your POS sent and received.
## Related topics
- [PassEntry Reader App Configuration Guide](/documentation/guides/passentry-reader-app/guide.md)
- [Loyalty](/api-reference/v1/loyalty/guide.md)
This documentation is built and hosted on [Mintlify](https://mintlify.com), a developer documentation platform.