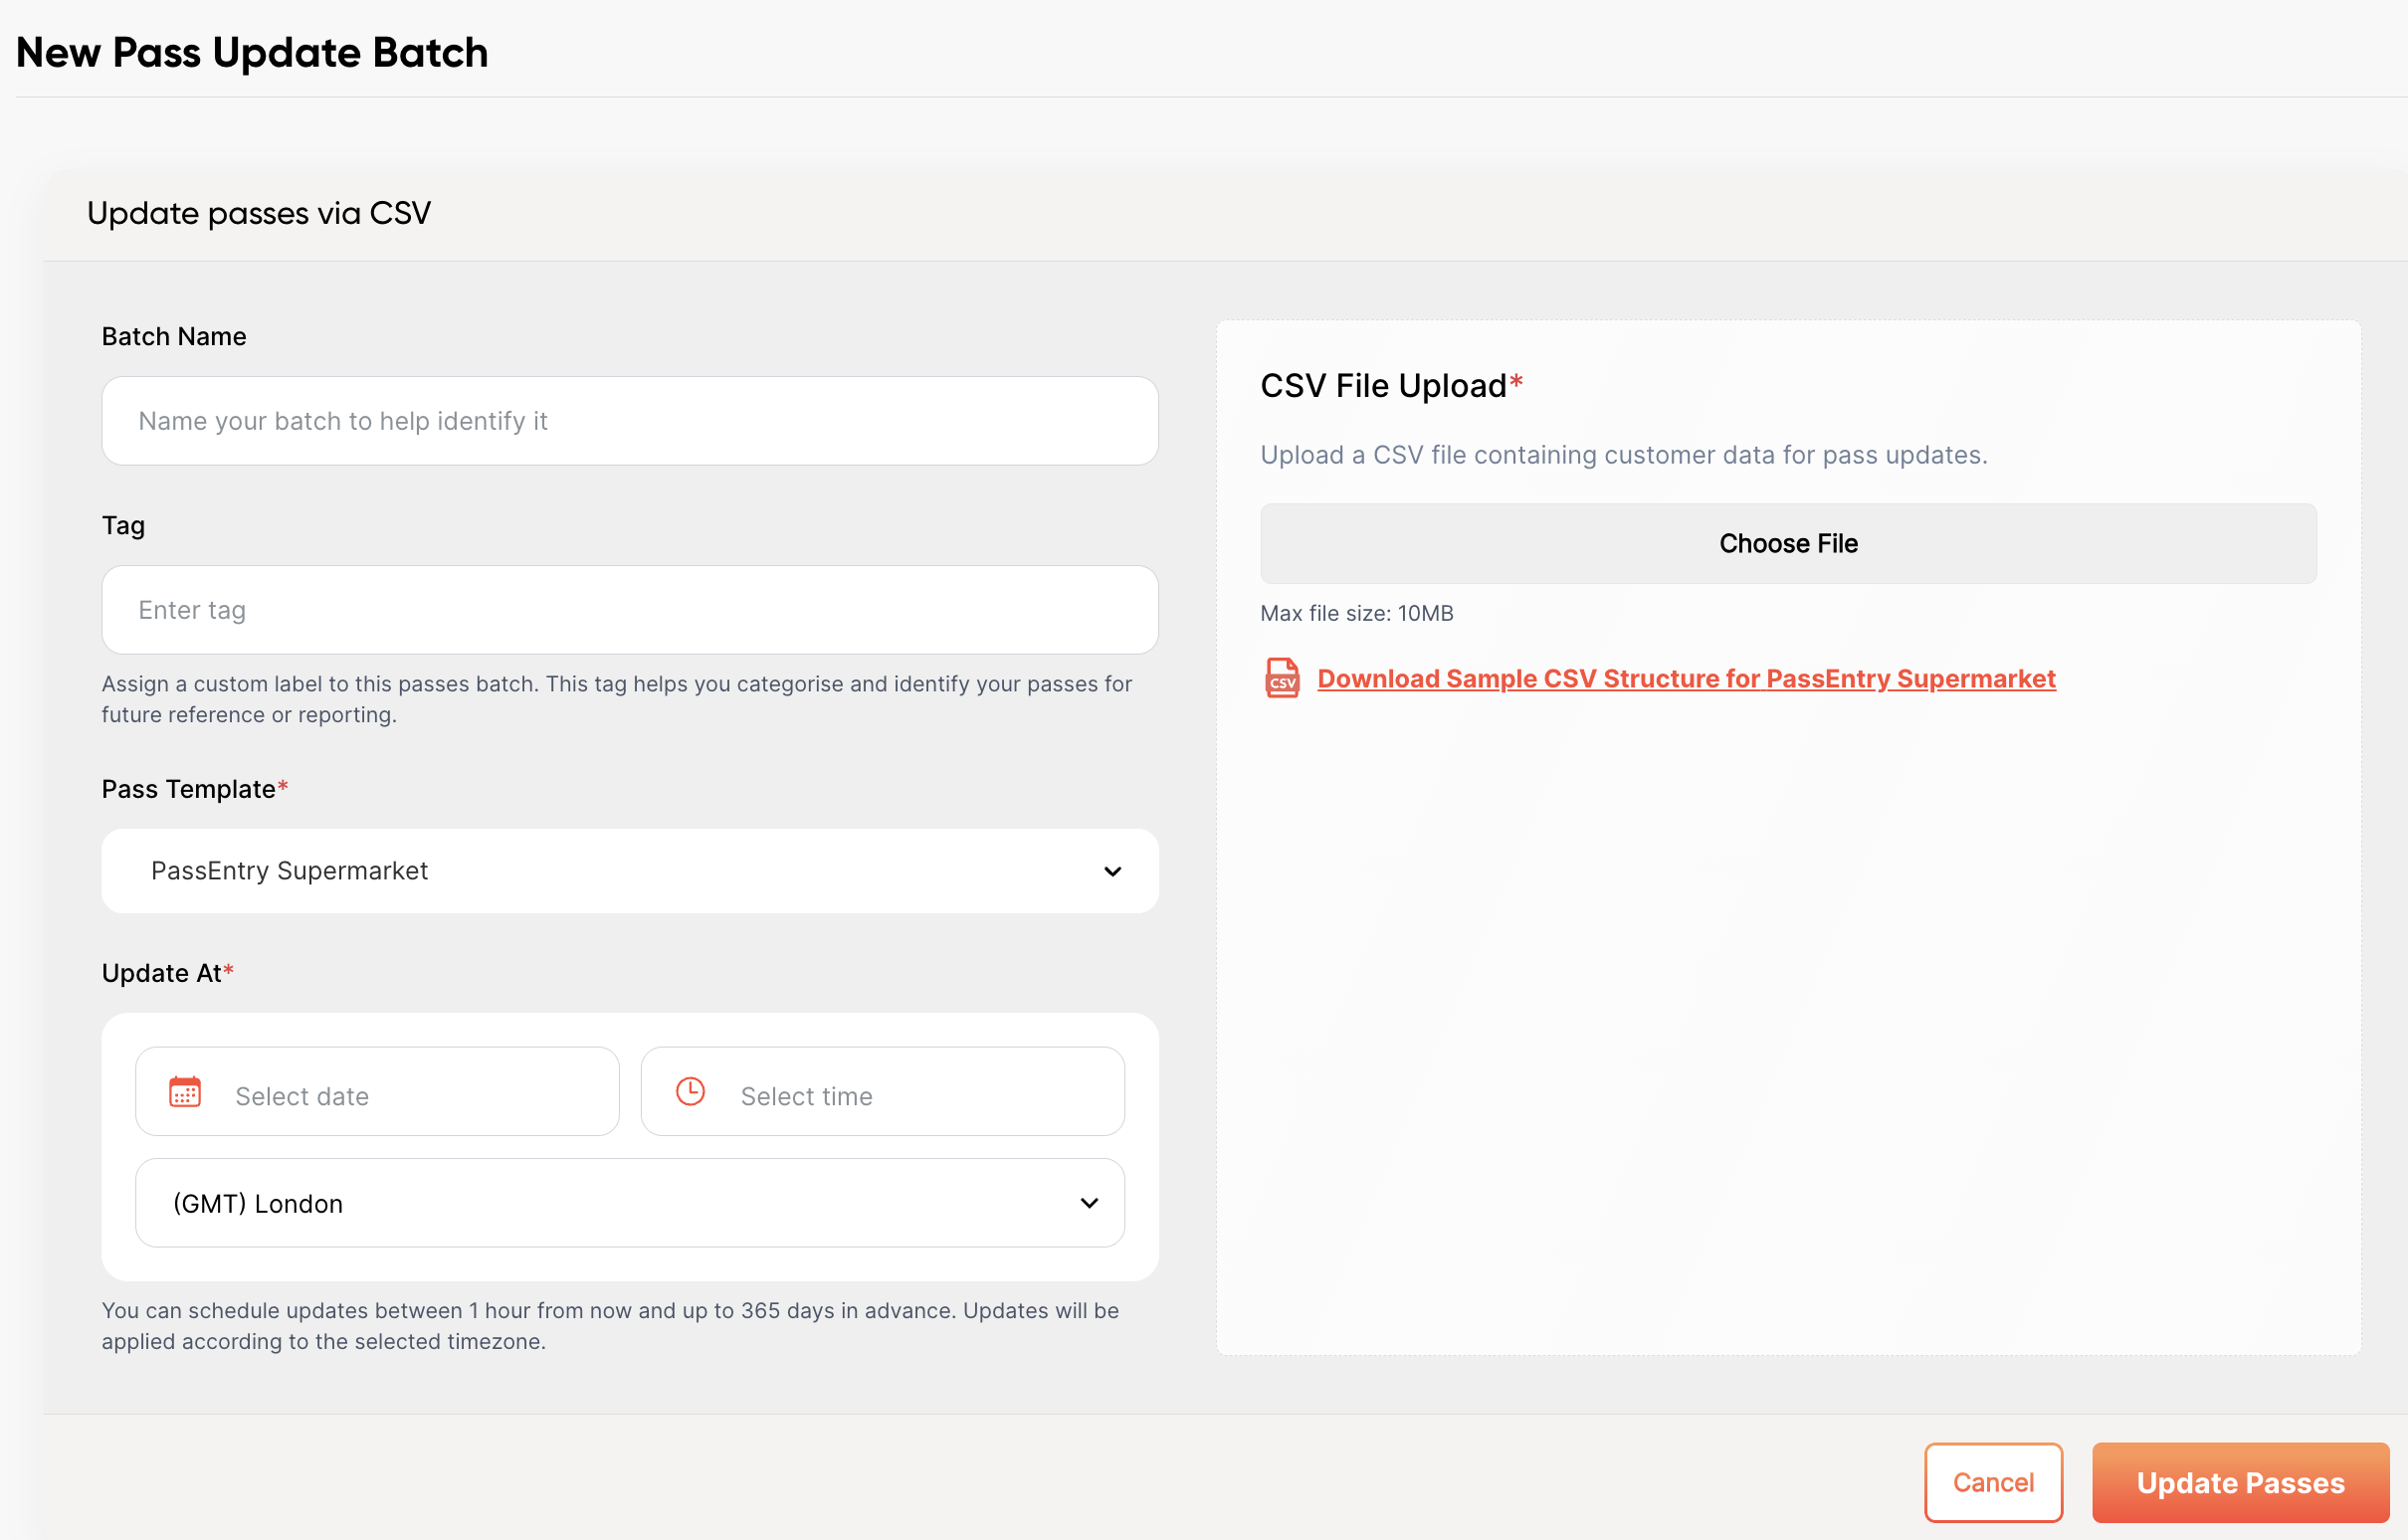
 **Sample CSV**
Once you've selected your Pass Template, you will be able to download a sample CSV, specific to your chosen Pass Template.
You can download an example CSV here: [HERE](/assets/passentry-pass-batch-update-sample.csv)
## Configuration
**Sample CSV**
Once you've selected your Pass Template, you will be able to download a sample CSV, specific to your chosen Pass Template.
You can download an example CSV here: [HERE](/assets/passentry-pass-batch-update-sample.csv)
## Configuration
| Column Name | Description | Required? | Example | Type |
|---|---|---|---|---|
| pass\_id | UUID or external ID for the pass | Yes | 1234567890 | Text (uuid or extId) |
| group\_tags | Comma separated tags to group passes | No | summer\_offer\_24 | Text (Any) |
| nfc\_enabled | Boolean to enable NFC | No | true | Boolean (true or false) |
| nfc\_source | Source of NFC data | No | extId | Text (extId or uuid or custom) |
| nfc\_custom\_value | Custom value for NFC, nfc\_source must be set to custom | No | summer\_20\_off | Text (any) |
| barcode\_enabled | Boolean to enable barcode | No | true | Boolean (true or false) |
| barcode\_type | Type of barcode | No | qr | Text (qr, code128, aztec or pdf417) |
| barcode\_source | Source of barcode | No | extId | Text (extId, uuid or custom) |
| barcode\_value | Value for the barcode, barcode\_source must be set to custom | No | abcd12345 | Text (Any) |
| barcode\_display\_text | Boolean to display barcode value as text | No | true | Boolean (true or false) |
| expires\_at | Expiration date and time for the pass | No | 2024-08-14T18:12:11Z | Datetime in iso8601 format |
| pass\_action | Action to perform on the pass | No | deactivate | Text (deactivate or reactivate) |
| override\_background\_color | Override the background colour of the pass, or `null` to revert to template default. [Restrictions apply depending on device and template type](../../../api-reference/v1/passes/update-pass#body-pass-template-override) | No | #000000 | Text (hex colour code or `null`) |
| override\_label\_color | Override the label colour of the pass, or `null` to revert to template default. [Restrictions apply depending on device and template type](../../../api-reference/v1/passes/update-pass#body-pass-template-override) | No | #FFFFFF | Text (hex colour code or `null`) |
| override\_text\_color | Override the text colour of the pass, or `null` to revert to template default. [Restrictions apply depending on device and template type](../../../api-reference/v1/passes/update-pass#body-pass-template-override) | No | #FFFFFF | Text (hex colour code or `null`) |
| override\_banner\_image\_asset\_id | UUID of a processed [Image Asset](/api-reference/v1/image-assets/guide) to use as the banner image, or `null` to remove | No | f47ac10b-58cc-4372-a567-0e02b2c3d479 | Text (UUID or `null`) |
| override\_logo\_image\_asset\_id | UUID of a processed [Image Asset](/api-reference/v1/image-assets/guide) to use as the logo image, or `null` to remove | No | f47ac10b-58cc-4372-a567-0e02b2c3d479 | Text (UUID or `null`) |
| override\_thumbnail\_image\_asset\_id | UUID of a processed [Image Asset](/api-reference/v1/image-assets/guide) to use as the thumbnail image (generic passes only), or `null` to remove | No | f47ac10b-58cc-4372-a567-0e02b2c3d479 | Text (UUID or `null`) |
 ### Special Characters and Markdown
When working with CSV files that include special characters such as commas, quotes, or line breaks—and especially when embedding HTML or markdown-style content—it’s important to format fields correctly to ensure they are parsed reliably.
Follow these rules:
* Commas (`,`): Wrap the entire field in double quotes (`"`).
* Line breaks (`\n`): Wrap the entire field in double quotes (`"`).
* Double quotes (`"`) inside fields: Use double quotes around the field, and escape inner quotes by doubling them (`""`).
* Markdown or HTML: Use double quotes around the full field, and use single quotes inside HTML attributes to avoid quote conflicts, or escape double quotes if needed.
For example\*\*:\*\*
| Desired Field Content | CSV-Compliant Value |
| ------------------------------------------ | ---------------------------------------------- |
| London, UK | "London, UK" |
| London\nUK (line break) | "London\nUK" |
| `Link` | `"Link"` |
| "Quoted Text" | """Quoted Text""" |
| `"Link"` | `"""Link"""` |
This will ensure that the special characters are handled correctly, and the markdown is rendered as expected.
## Tracking and managing your batches
Once you've uploaded your CSV, you'll be able to track the progress of your batch.
The progress bar will update in real-time, and you'll be able to see the number of passes processed, pending, and total.
If the progress bar is not updating, please refresh the page.
### Special Characters and Markdown
When working with CSV files that include special characters such as commas, quotes, or line breaks—and especially when embedding HTML or markdown-style content—it’s important to format fields correctly to ensure they are parsed reliably.
Follow these rules:
* Commas (`,`): Wrap the entire field in double quotes (`"`).
* Line breaks (`\n`): Wrap the entire field in double quotes (`"`).
* Double quotes (`"`) inside fields: Use double quotes around the field, and escape inner quotes by doubling them (`""`).
* Markdown or HTML: Use double quotes around the full field, and use single quotes inside HTML attributes to avoid quote conflicts, or escape double quotes if needed.
For example\*\*:\*\*
| Desired Field Content | CSV-Compliant Value |
| ------------------------------------------ | ---------------------------------------------- |
| London, UK | "London, UK" |
| London\nUK (line break) | "London\nUK" |
| `Link` | `"Link"` |
| "Quoted Text" | """Quoted Text""" |
| `"Link"` | `"""Link"""` |
This will ensure that the special characters are handled correctly, and the markdown is rendered as expected.
## Tracking and managing your batches
Once you've uploaded your CSV, you'll be able to track the progress of your batch.
The progress bar will update in real-time, and you'll be able to see the number of passes processed, pending, and total.
If the progress bar is not updating, please refresh the page.
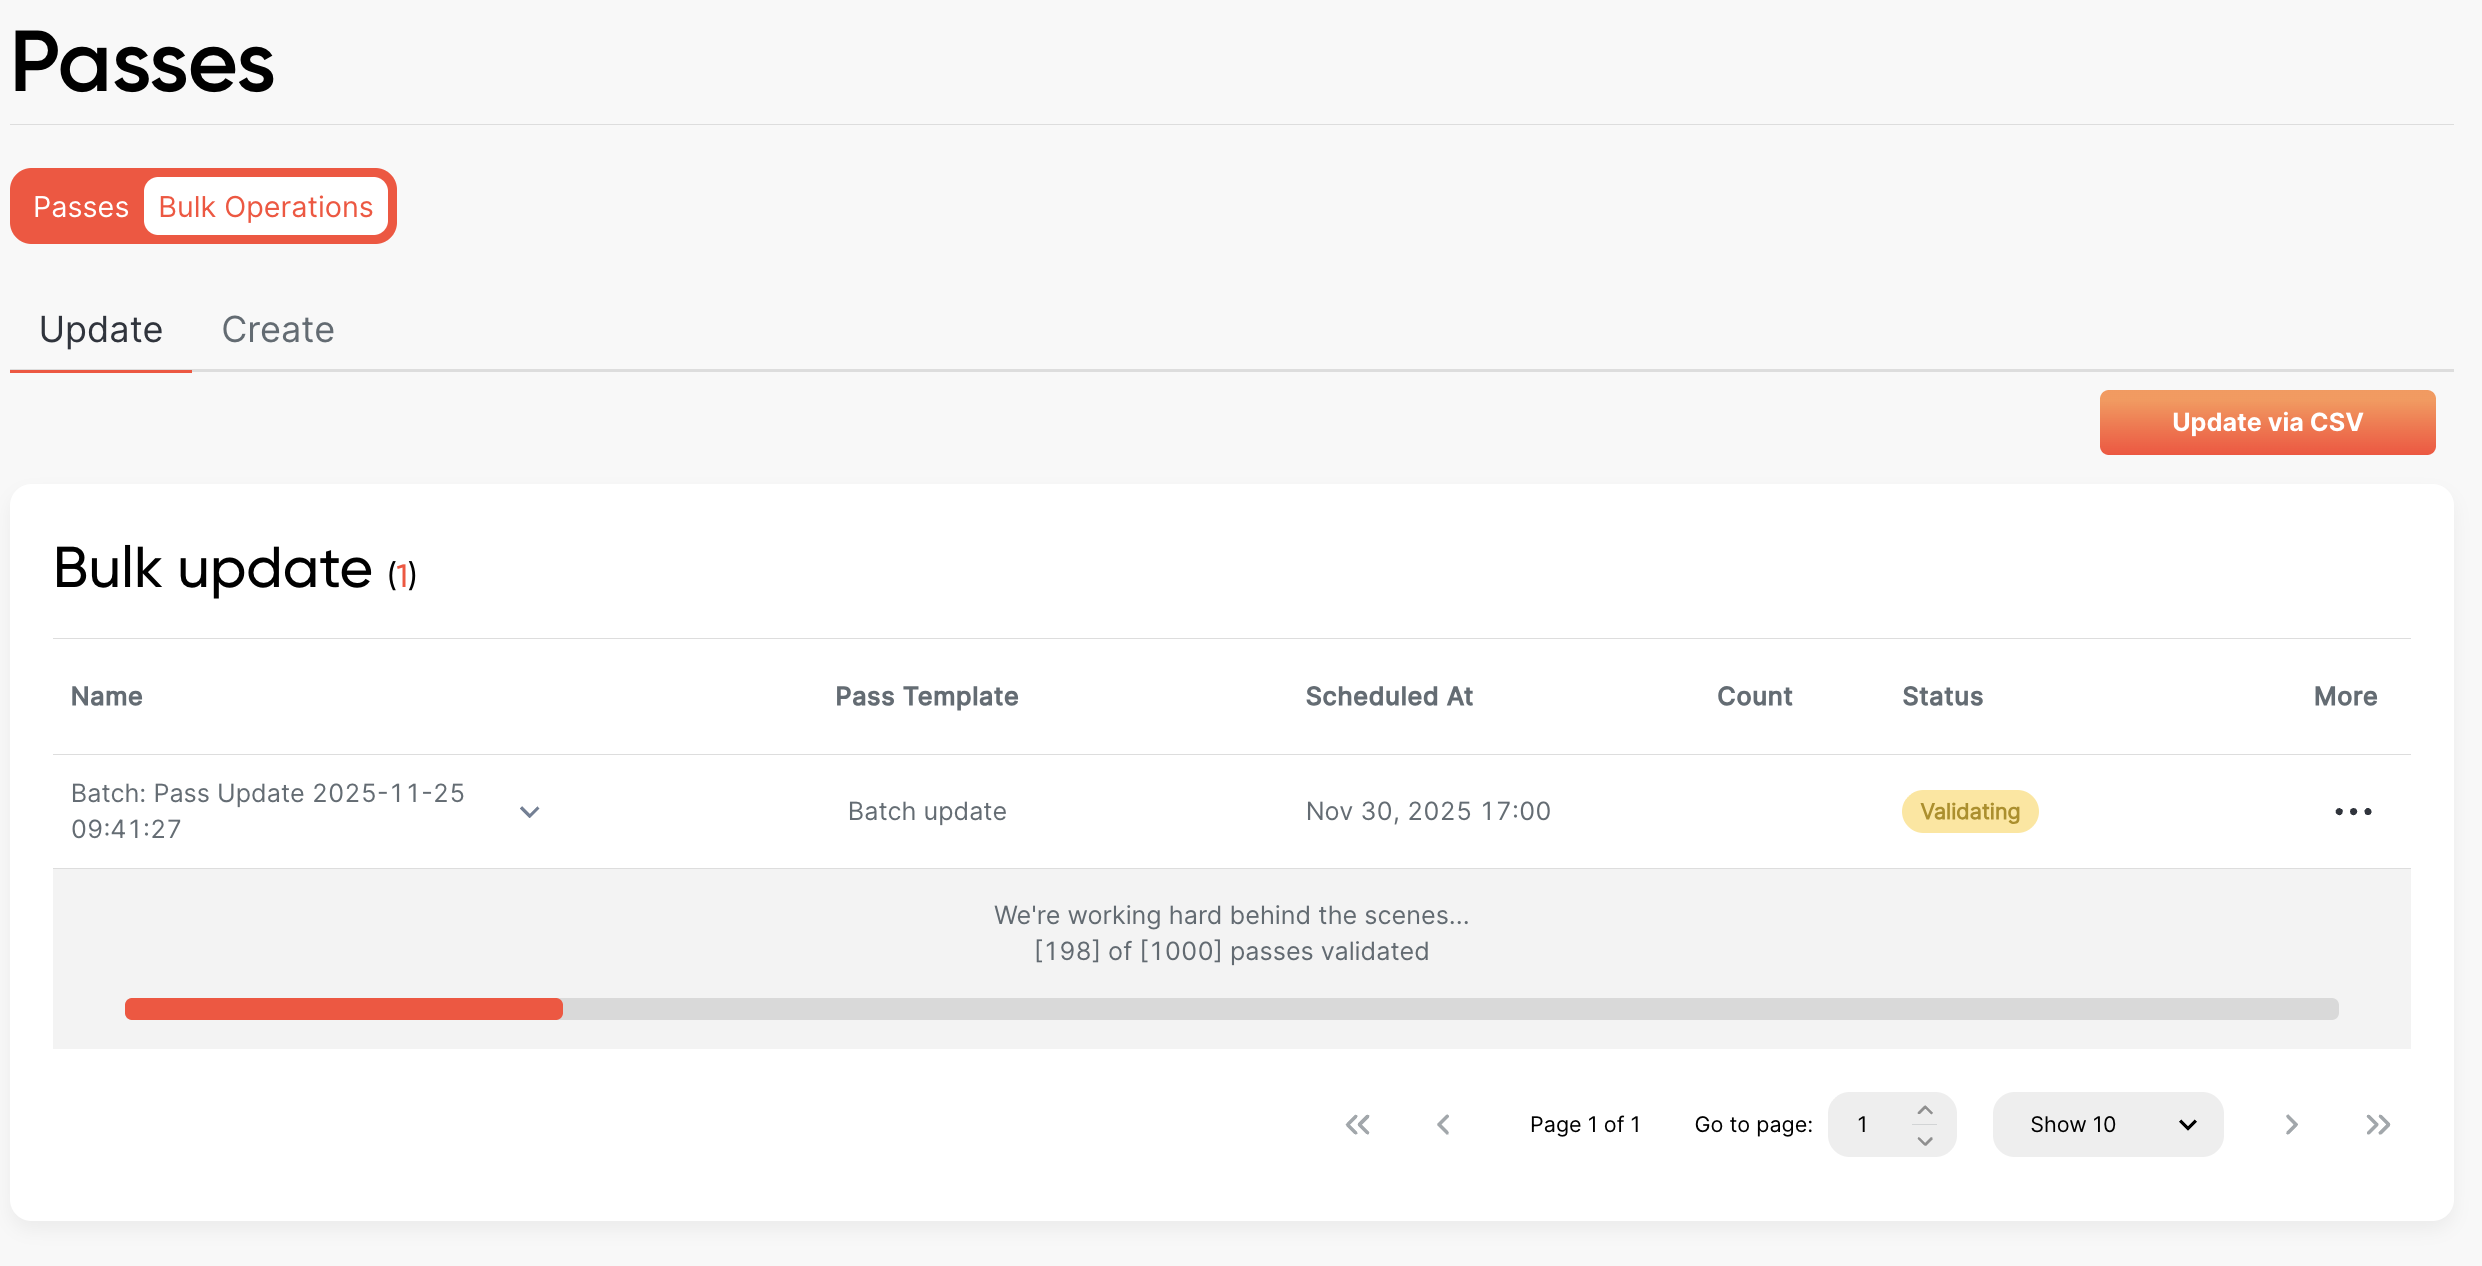 The batch will be listed in the "Batches" section, and you can click on it to see the progress of the batch.
* **Main Information**: Each batch displays key details such as the batch name, template name, status, and scheduled time.
* **Cancelling a scheduled batch**: You can cancel a scheduled batch at any time prior to the scheduled update time.
* **Rescheduling a batch**: To reschedule an existing batch, cancel it, and create a new batch with the desired scheduled time.
* **Updating a batch ahead of schedule**: You can update a batch ahead of schedule by clicking the "Update now" button. This will process the updates immediately.
## Error handling
If there are any errors, you'll be able to download a CSV of the errors that occurred, and once you've fixed them, you can re-upload the CSV to try again.
## FAQ
### Will this overwrite all fields on my passes?
No. Only the columns included in your CSV will be updated. Any fields omitted from the CSV will remain unchanged on the pass.
### When should I use batch updates instead of the Update Pass API?
Use batch updates for one-off or infrequent bulk changes, such as migrations or campaign-wide updates. For real-time or recurring updates, use the Update Pass API.
### What happens if some rows fail to update?
If any rows fail, you can download an error CSV showing which passes failed and why. After fixing the errors, you can re-upload the CSV to retry.
## Related topics
- [Update Passes Batch](/api-reference/v1/batches/update-passes-batch.md)
- [Pass Lifecycle](/documentation/passes/lifecycle/guide.md)
The batch will be listed in the "Batches" section, and you can click on it to see the progress of the batch.
* **Main Information**: Each batch displays key details such as the batch name, template name, status, and scheduled time.
* **Cancelling a scheduled batch**: You can cancel a scheduled batch at any time prior to the scheduled update time.
* **Rescheduling a batch**: To reschedule an existing batch, cancel it, and create a new batch with the desired scheduled time.
* **Updating a batch ahead of schedule**: You can update a batch ahead of schedule by clicking the "Update now" button. This will process the updates immediately.
## Error handling
If there are any errors, you'll be able to download a CSV of the errors that occurred, and once you've fixed them, you can re-upload the CSV to try again.
## FAQ
### Will this overwrite all fields on my passes?
No. Only the columns included in your CSV will be updated. Any fields omitted from the CSV will remain unchanged on the pass.
### When should I use batch updates instead of the Update Pass API?
Use batch updates for one-off or infrequent bulk changes, such as migrations or campaign-wide updates. For real-time or recurring updates, use the Update Pass API.
### What happens if some rows fail to update?
If any rows fail, you can download an error CSV showing which passes failed and why. After fixing the errors, you can re-upload the CSV to retry.
## Related topics
- [Update Passes Batch](/api-reference/v1/batches/update-passes-batch.md)
- [Pass Lifecycle](/documentation/passes/lifecycle/guide.md)